
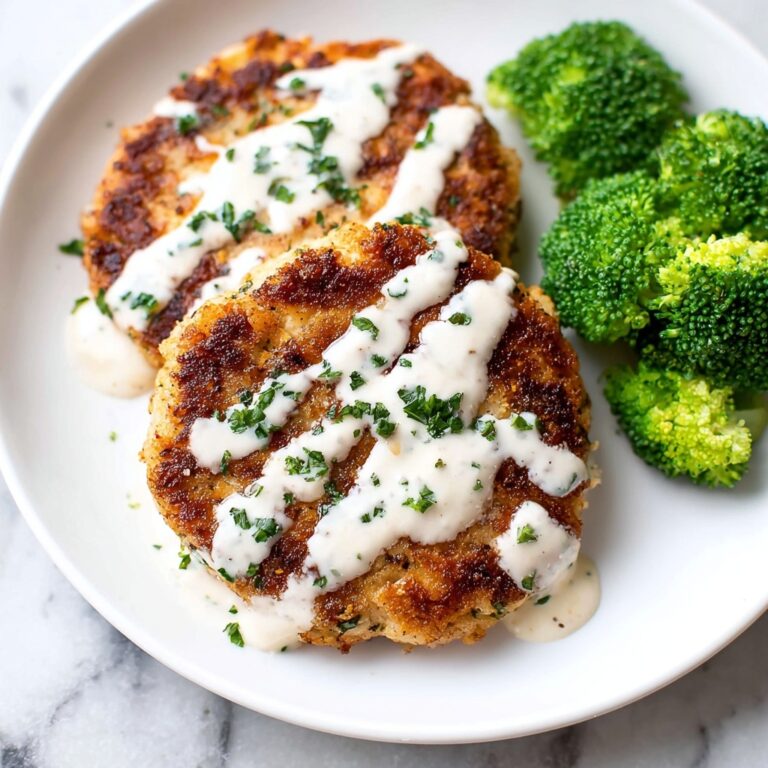
If you’re craving a dish that combines the comforting warmth of chicken with a melty cheesy center and a burst of fresh vegetables, then the Cheesy Chicken Rissoles with Vegetables and Dipping Ketchup Recipe is exactly what you need. This delightful recipe balances juicy chicken mince with the natural sweetness of grated carrot and zucchini, all brought together by the gooey goodness of melted Colby cheese. Paired with a tangy ketchup for dipping, these rissoles deliver irresistible flavor and a satisfying texture that’s perfect for family dinners or casual gatherings. Once you try this recipe, it’s bound to become a favorite go-to meal that everyone will adore.

Ingredients You’ll Need
Gathering the right ingredients is the first and most fun step to creating these tasty chicken rissoles. Each component plays a crucial role in ensuring the perfect texture, color, and flavor, making the cooking process smooth and the results absolutely delicious.
- 500g / 1 lb chicken mince: Use ground chicken with excess liquid drained to avoid soggy rissoles and ensure juicy yet firm patties.
- 1 carrot, medium, grated: Adds a hint of sweetness and vibrant color while keeping the rissoles moist.
- 1 zucchini, medium, grated: Brings a tender texture and fresh earthiness, also helps bind the mixture together.
- 1 egg: Acts as the natural binder holding all ingredients together perfectly.
- 1 1/2 cup Colby cheese, shredded: Or swap for cheddar, tasty, or Monterey Jack; this adds creamy, melty richness inside each rissole.
- 3/4 cup panko breadcrumbs: Provides lightness and crunch to the outer texture, helping the rissoles hold shape during cooking.
- 1 tbsp finely chopped parsley (optional): Adds a fresh, herbal note that brightens the overall flavor.
- 1 tsp cooking/kosher salt: Enhances all other flavors, essential for a well-seasoned result.
- 1/2 tsp black pepper: Provides a subtle kick without overpowering the delicate chicken taste.
- 2 tbsp canola oil: For pan-frying to achieve that beautiful golden crust on the outside.
- Ketchup: The perfect dip — tangy, sweet, and familiar, it complements the savory, cheesy rissoles flawlessly.
How to Make Cheesy Chicken Rissoles with Vegetables and Dipping Ketchup Recipe
Step 1: Preheat and Prepare
First, set your oven to 100°C (210°F). This gentle heat isn’t for cooking but to keep your rissoles warm while you finish frying all of them. Place a wire rack over a tray so the residual heat circulates evenly, preventing sogginess.
Step 2: Mix the Rissole Ingredients
In a large bowl, combine the chicken mince, grated carrot and zucchini, egg, shredded cheese, panko breadcrumbs, parsley if using, salt, and pepper. Use a wooden spoon to mix everything thoroughly until the mixture is uniform. This ensures every bite is packed with flavor and texture.
Step 3: Shape Your Rissoles
Wet your hands lightly to stop the mixture from sticking as you shape. Measure just under 1/4 cup of the mixture per rissole and form into patties roughly 6 cm wide and 1.5 cm thick. If your mixture feels too loose, consider adding a bit more breadcrumbs to help firm them up. This step shapes the dish visually and helps with even cooking.
Step 4: Pan-Fry to Golden Perfection
Heat 1 tablespoon of canola oil in a large non-stick pan over medium-high heat. Fry 5 to 6 rissoles at a time, cooking each side for 3 to 4 minutes until they’re beautifully golden brown and crisp on the outside. This frying technique locks in juiciness while creating an irresistible crust.
Step 5: Keep Warm
Once cooked, transfer your golden rissoles to the preheated oven rack to keep warm and maintain that perfect texture. Add a little more oil to the pan if needed and repeat cooking with the remaining rissoles until all are done.
Step 6: Serve and Enjoy!
The best part: eating! Serve your fresh batch of Cheesy Chicken Rissoles with Vegetables and Dipping Ketchup Recipe straight away alongside a generous helping of ketchup for dipping. The contrast of hot, cheesy patties with sweet, tangy ketchup is downright addictive.
How to Serve Cheesy Chicken Rissoles with Vegetables and Dipping Ketchup Recipe

Garnishes
Sprinkle freshly chopped parsley or chives on top to add a pop of color and a fresh herbal note that complements the richness of the cheese and chicken. If you like a bit of heat, a light drizzle of hot sauce or a dusting of smoked paprika can enhance the flavor beautifully.
Side Dishes
These rissoles shine best with colorful, crisp side dishes. Think a crunchy garden salad, steamed green beans, or roasted sweet potato fries. The veggie sides keep the meal balanced and add freshness to each bite, making the meal nutritious and hearty.
Creative Ways to Present
Try serving your rissoles as sliders on mini buns with a cabbage slaw and ketchup for dipping on the side—perfect for entertaining! Or arrange them on a vibrant platter with veggie sticks and multiple dips, transforming this simple recipe into an impressive appetizer spread that’ll wow your guests.
Make Ahead and Storage
Storing Leftovers
If you have leftovers, store the cooled rissoles in an airtight container in the fridge for up to 3 days. This makes for a quick snack or a ready-to-go meal that reheats wonderfully without losing moisture or flavor.
Freezing
These rissoles freeze beautifully! Lay them in a single layer on a baking tray to freeze solid, then transfer to a freezer-safe bag or container. Frozen, they’ll keep for up to 2 months and can be cooked from frozen for convenience.
Reheating
To reheat, pop the rissoles in a preheated oven at 180°C (350°F) for about 10-15 minutes until hot throughout and crisp again on the outside. Avoid microwaving if you want to maintain that golden crust and cheesy gooey center.
FAQs
Can I use different types of cheese in this Cheesy Chicken Rissoles with Vegetables and Dipping Ketchup Recipe?
Absolutely! While Colby cheese melts beautifully, you can substitute with cheddar, tasty, Monterey Jack, or a combination for varied flavor profiles. Just pick cheeses that melt well and complement chicken.
What if I don’t have panko breadcrumbs?
If panko isn’t available, regular breadcrumbs will work fine. Panko just adds a lighter, crunchier texture. You could also pulse some crackers or dry bread in a food processor to create your own breadcrumbs.
Can I bake the rissoles instead of frying?
Yes, you can bake them for a healthier option! Preheat your oven to 200°C (400°F), place rissoles on a greased tray, and bake for around 20-25 minutes, flipping halfway, until browned and cooked through.
Are these rissoles kid-friendly?
Definitely! The cheesy center and mild seasoning make these rissoles very appealing to kids. Plus, the veggies are sneaky additions that boost nutrition without overpowering flavor.
What can I use instead of ketchup for dipping?
Try other dips like barbecue sauce, sweet chili sauce, honey mustard, or a creamy garlic aioli. They all pair wonderfully and give you a chance to mix up flavors depending on your mood or occasion.
Final Thoughts
There is something truly comforting about homemade Cheesy Chicken Rissoles with Vegetables and Dipping Ketchup Recipe, a dish that brings warmth, flavor, and smiles to the table. It’s simple to make but packed with big, satisfying taste — perfect for any day you want a fuss-free meal that doesn’t compromise on deliciousness. I hope you enjoy making and sharing this recipe as much as I do. Happy cooking and even happier eating!
Print
Cheesy Chicken Rissoles with Vegetables and Dipping Ketchup Recipe
- Prep Time: 10 minutes
- Cook Time: 20 minutes
- Total Time: 35 minutes
- Yield: 16 servings
- Category: Main Dish
- Method: Frying
- Cuisine: Australian
Description
These Chicken Rissoles are flavorful and juicy patties made with ground chicken, grated vegetables, cheese, and seasoned with parsley, salt, and pepper. Cooked in a pan until golden brown, they are a perfect tasty snack or meal served with ketchup for dipping.
Ingredients
Main Ingredients
- 500g / 1 lb chicken mince (ground chicken), excess liquid drained and discarded
- 1 medium carrot, grated on a shallow angle
- 1 medium zucchini, grated on a shallow angle
- 1 egg
- 1 1/2 cup Colby cheese, shredded (or cheddar, tasty, Monterey Jack)
- 3/4 cup panko breadcrumbs
- 1 tbsp finely chopped parsley (optional)
- 1 tsp cooking/kosher salt
- 1/2 tsp black pepper
- 2 tbsp canola oil
- Ketchup – for dipping
Instructions
- Preheat the oven: Set your oven to 100°C/210°F (all oven types) to keep the cooked rissoles warm later. Place a rack over a tray for resting the cooked patties.
- Prepare the rissole mixture: In a bowl, combine the chicken mince, grated carrot, grated zucchini, egg, shredded cheese, panko breadcrumbs, chopped parsley, salt, and pepper. Mix thoroughly using a wooden spoon until all ingredients are well incorporated.
- Form the patties: Wet your hands to prevent sticking. Measure just shy of 1/4 cup of the mixture each time and shape into patties approximately 6 cm wide and 1.5 cm thick (about 2.4 inches by 0.6 inches). If the mixture feels too loose, refer to Note 1 about draining excess moisture.
- Cook the rissoles: Heat 1 tablespoon of canola oil in a large non-stick pan over medium-high heat. Cook 5 to 6 rissoles at once, frying each side for 3 to 4 minutes until they develop a beautiful golden-brown crust.
- Keep warm: Transfer the cooked rissoles to the prepared rack and tray in the preheated oven to keep warm. Add more oil to the pan if needed and cook the remaining rissoles in batches.
- Serve: Serve the rissoles immediately with ketchup on the side for dipping.
Notes
- Note 1: If your mixture feels too wet or loose, ensure excess liquid from the chicken mince is drained well before mixing. You can also press the mixture in a sieve or wrap in a clean cloth to squeeze out additional moisture if needed.
- Note 2: Grating the carrot and zucchini on a shallow angle creates thin ribbons that blend nicely into the mixture for texture and moisture.
- Note 3: Cheeses like cheddar, tasty, or Monterey Jack can be used instead of Colby according to preference.
- Note 4: Panko breadcrumbs add a light texture to the rissoles. Regular breadcrumbs can be substituted but may affect the final texture.
- Note 5: For baking instead of frying, you can preheat your oven to 200°C/400°F, place the rissoles on a lined baking sheet, and bake for approximately 15-20 minutes turning halfway, until golden and cooked through.


