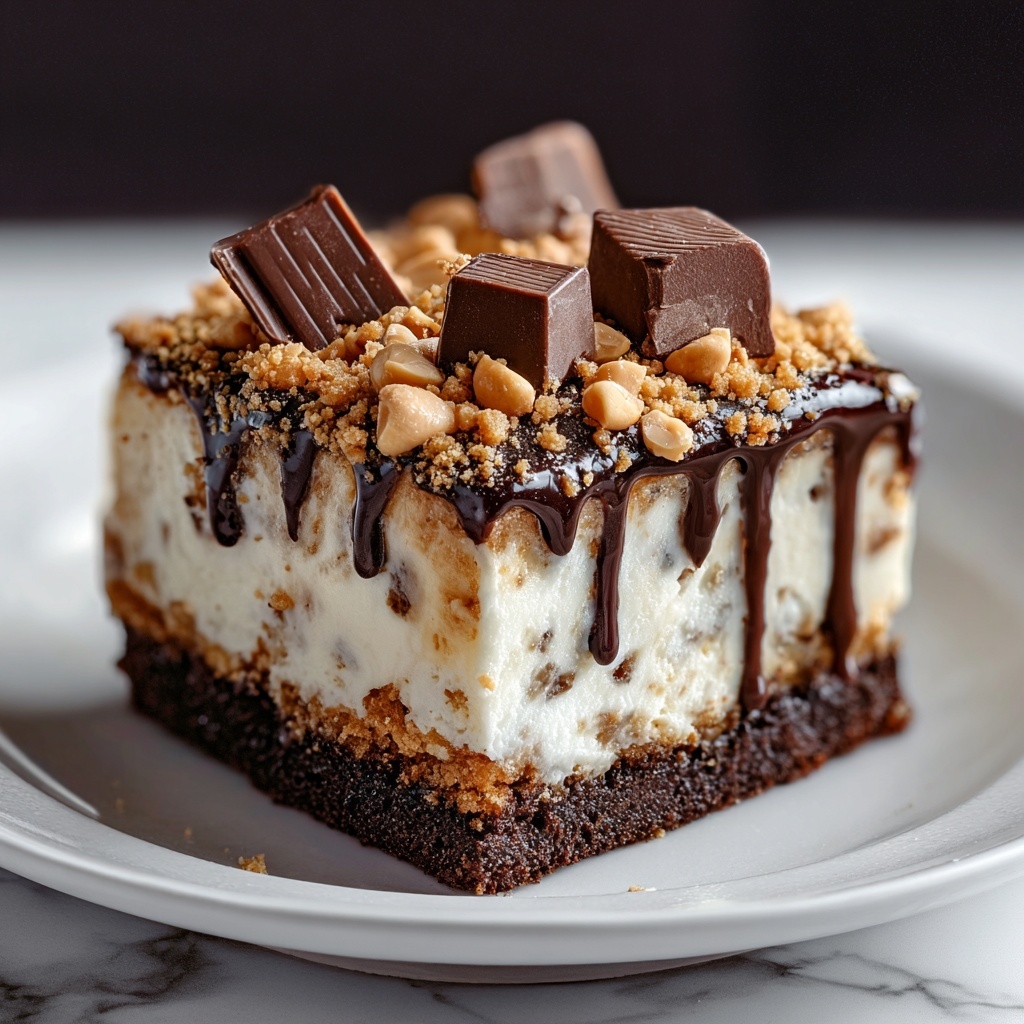
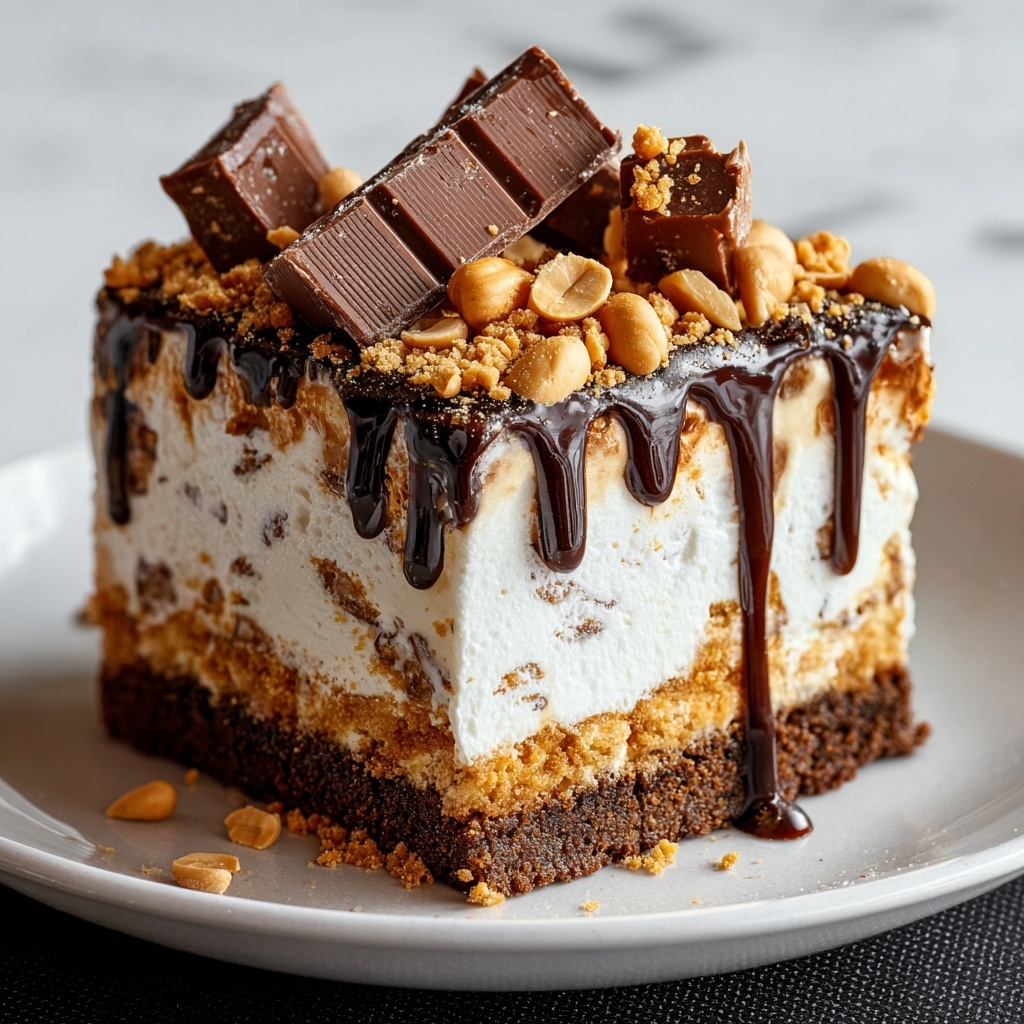
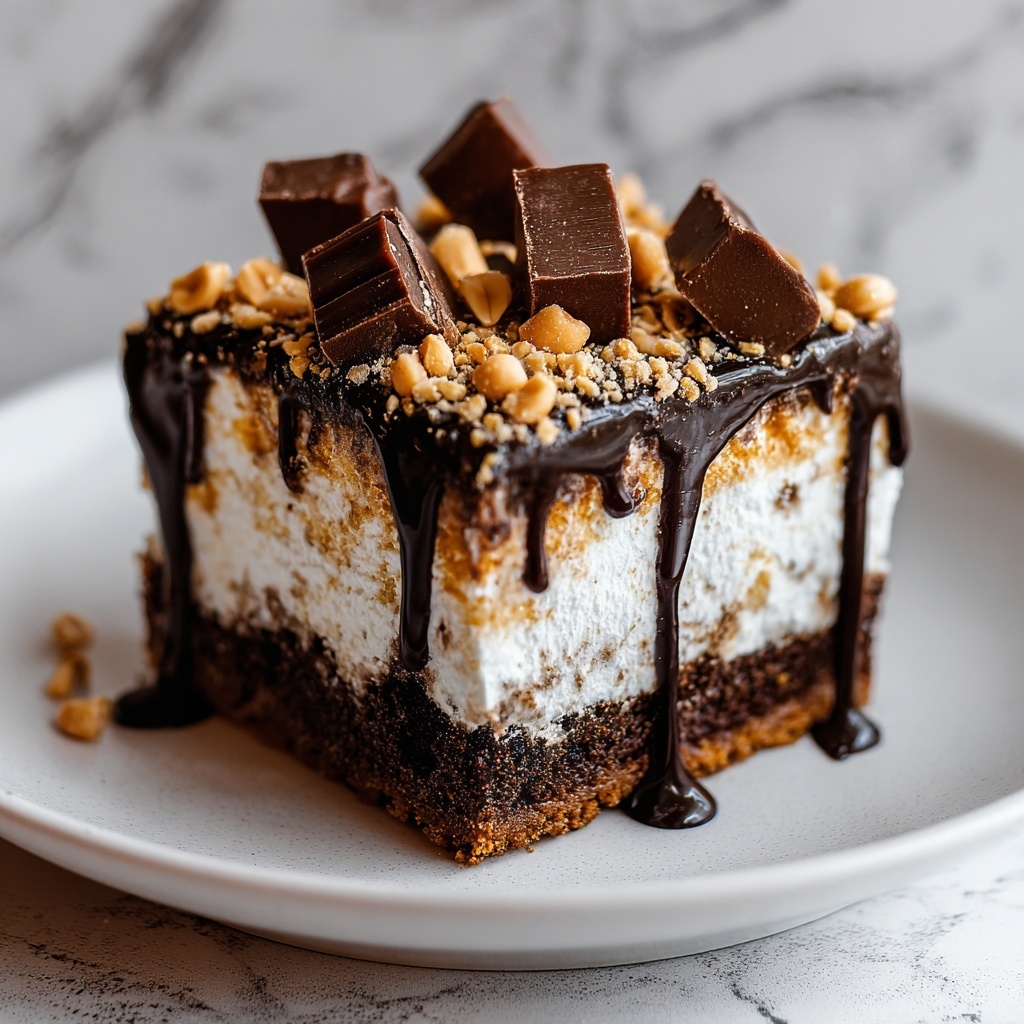
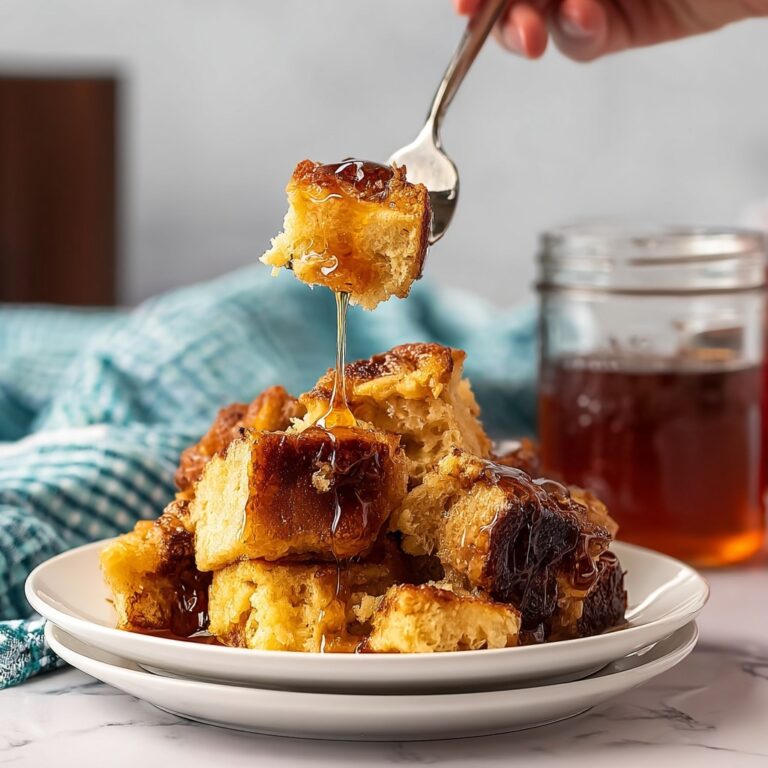
If you have a sweet tooth craving something irresistibly nostalgic and decadently delicious, then this Butterfinger Candy Bar Poke Cake Recipe is exactly what you need to try next. Imagine a moist chocolate or vanilla cake, each bite oozing with a luscious pudding and sweetened condensed milk mixture, topped with a cloud of whipped cream and studded with crunchy Butterfinger candy bits. Every forkful offers a perfect balance of creamy, crunchy, and chocolaty textures that make this dessert an instant crowd-pleaser. Whether it’s a family gathering or just a treat for yourself, this poke cake takes simplicity to new heights of indulgence with such classic flavors we all love.
Ingredients You’ll Need
Gathering the right ingredients is the secret to nailing this Butterfinger Candy Bar Poke Cake Recipe. Each one is simple yet essential, working together to create that delightful blend of creamy, crunchy, and rich flavors. From the boxed cake mix that makes preparation a breeze to the chopped Butterfinger bars that add that perfect crunch, these ingredients promise a show-stopping dessert with minimal effort.
- 1 box chocolate or vanilla cake mix: Provides your cake base, choose according to your flavor preference for a perfect moist texture.
- Instant pudding mix (vanilla or chocolate): Adds a creamy, soft filling that soaks into the cake holes.
- 2 cups cold milk: Used to prepare the pudding, delivering a smooth consistency.
- 1 can (14 oz) sweetened condensed milk: Infuses extra sweetness and richness throughout the cake.
- 1 tub (8 oz) whipped topping (Cool Whip), thawed: Folded in for a light, fluffy finish in the filling layer.
- 4–5 Butterfinger candy bars, chopped: The star ingredient that brings satisfying crunch and a peanut buttery flavor.
- Butter and sugar (optional): Can be used for greasing the pan or adding extra richness to the cake base if desired.
- Peanut butter and caramel sauce: Perfect for drizzling on top to elevate the flavor and presentation.
How to Make Butterfinger Candy Bar Poke Cake Recipe
Step 1: Bake the Cake
Start with your boxed chocolate or vanilla cake mix, prepared exactly as the package instructions direct. Pour the batter into a greased 9×13-inch pan to ensure the cake doesn’t stick and bakes evenly. Once baked to perfection, let it cool just enough until it’s warm but still manageable to poke holes — this warmth helps the filling sink in beautifully.
Step 2: Poke Holes in the Cake
Using the handle of a wooden spoon or a sturdy skewer, poke holes evenly and consistently all over the surface of the cake. These holes are critical because they allow the luscious filling to soak deep into the cake, infusing every bite with creamy goodness and elevating the texture from simple cake to a moist, dreamy dessert.
Step 3: Prepare the Filling
In a medium bowl, whisk together the instant pudding mix and cold milk until the mixture thickens nicely. Then stir in the sweetened condensed milk to add richness and sweetness. Finally, gently fold in the thawed whipped topping, carefully mixing to keep the filling light and airy — this combination is the magic that gives the poke cake its signature creamy layer.
Step 4: Pour Filling Over Cake
Slowly and evenly pour or spoon the pudding mixture over the poke holes and the surface of the cake. Make sure the filling seeps down into every hole and covers the entire cake, creating layers of flavor that will meld together perfectly after chilling.
Step 5: Chill and Apply Toppings
Cover the cake with plastic wrap and refrigerate it for at least 2 hours to let the filling set firmly inside the cake. When it’s time to serve, shower the top generously with chopped Butterfinger candy bars. The crunch they add against the softness of the cake and cream is pure magic, making this Butterfinger Candy Bar Poke Cake Recipe an unforgettable treat.
How to Serve Butterfinger Candy Bar Poke Cake Recipe
Garnishes
The topping is where you can have a little fun enhancing the cake’s indulgence. In addition to the chopped Butterfinger bars, a drizzle of peanut butter and caramel sauce adds a gorgeous glossy finish and extra depth of flavor. Sprinkling a tiny pinch of crushed peanuts or a dusting of cocoa powder can also provide beautiful texture contrasts and visual appeal.
Side Dishes
This poke cake shines brightly on its own but pairing it with simple vanilla ice cream or a scoop of coffee gelato creates a scrumptious dessert tableau that your guests will rave about. Fresh berries on the side can add a refreshing burst that balances the richness and adds a pop of color to your dessert spread.
Creative Ways to Present
Serving this Butterfinger Candy Bar Poke Cake Recipe in individual glass jars or clear cups offers a fun and elegant personal touch that shows off the beautiful layers. Alternatively, turning leftovers into cake trifle with alternating layers of whipped cream, chopped Butterfinger pieces, and pudding is a clever way to enjoy this dessert in a new form.
Make Ahead and Storage
Storing Leftovers
Leftover poke cake should always be refrigerated, covered tightly with plastic wrap or stored in an airtight container to preserve moisture and freshness. It will stay delicious for up to 3-4 days, making it a perfect dessert to prep in advance or enjoy over several days.
Freezing
If you want to store this Butterfinger Candy Bar Poke Cake Recipe for longer, it freezes beautifully. Wrap the cooled cake tightly in plastic wrap and then again in foil or place it in a freezer-safe container. When frozen properly, it can last up to 2 months. Just thaw it overnight in the fridge before serving.
Reheating
This cake is best served chilled, so reheating is generally not recommended. However, if you prefer a warmer dessert, you can let a single slice sit at room temperature for 30 minutes before eating or briefly warm it in the microwave for about 10 seconds, but don’t overheat or the pudding layer may lose its creamy texture.
FAQs
Can I use homemade cake instead of boxed mix?
Absolutely! Homemade cake works wonderfully and adds a personal touch, though the boxed mix keeps things super simple and reliable, especially for busy days. Just ensure your cake isn’t too dry so the pudding can soak in properly.
What other candy bars can I use?
While Butterfinger bars are the star here, feel free to experiment with other crunchy candy bars like Heath, Twix, or even chopped peanut M&Ms to create your own unique poke cake variation.
Can I make this cake gluten-free?
Yes! Use a gluten-free cake mix and confirm your pudding mix and other ingredients are gluten-free, and you’ll have a delightful gluten-free version without sacrificing taste or texture.
Is it possible to make this cake dairy-free?
With some ingredient swaps like dairy-free pudding mixes, coconut whipped topping, and sweetened condensed coconut milk, you can tailor this Butterfinger Candy Bar Poke Cake Recipe to be dairy-free and still delicious.
How far in advance can I make this dessert?
This poke cake actually tastes better after resting overnight because it gives the flavors time to meld. Prepare it a day ahead and keep it refrigerated for the best results.
Final Thoughts
There is something truly comforting and fun about making and sharing this Butterfinger Candy Bar Poke Cake Recipe. Its luscious layers, crunchy candy, and creamy finish come together in a way that feels both special and effortless. Whether you’re rewarding yourself after a long day or surprising friends at your next gathering, this cake is sure to become a new favorite in your dessert repertoire. Give it a try — I promise it’s worth every bite!
Print
Butterfinger Candy Bar Poke Cake Recipe
- Prep Time: 30 minutes
- Cook Time: 45 minutes
- Total Time: 3 hours 30 minutes
- Yield: 12 servings
- Category: Dessert
- Method: Baking
- Cuisine: American
Description
This Butterfinger Candy Bar Poke Cake is a decadent dessert featuring a moist chocolate or vanilla cake infused with a creamy pudding filling and topped with crunchy chopped Butterfinger candy bars. The recipe combines a boxed cake mix and instant pudding for convenience, creating a fluffy, flavorful treat perfect for any occasion. The poke holes in the cake allow the rich filling to seep in, guaranteeing every bite is bursting with creamy, crunchy goodness, enhanced further with drizzles of peanut butter and caramel sauce.
Ingredients
For the Cake
- 1 box chocolate or vanilla cake mix (plus ingredients needed according to box instructions)
For the Filling
- 1 package instant pudding mix (vanilla or chocolate)
- 2 cups cold milk
- 1 can (14 oz) sweetened condensed milk
- 1 tub (8 oz) whipped topping (Cool Whip), thawed
Toppings and Extras
- 4–5 Butterfinger candy bars, chopped
- Butter and sugar (optional, for extra richness in cake base or topping)
- Peanut butter (for drizzle)
- Caramel sauce (for drizzling)
Instructions
- Bake the Cake: Prepare the boxed cake mix according to the package instructions. Pour the batter into a greased 9×13-inch baking pan. Bake as directed on the box until a toothpick inserted into the center comes out clean. Once baked, remove the cake from the oven and let it cool slightly until it is warm but still manageable to work with.
- Poke Holes in the Cake: Using the handle of a wooden spoon or a skewer, poke holes evenly spaced across the entire surface of the warm cake. These holes allow the filling to seep deeply into the cake, enhancing moisture and flavor throughout.
- Prepare the Filling: In a mixing bowl, whisk together the instant pudding mix and 2 cups of cold milk until thickened and smooth. Stir in the entire 14 oz can of sweetened condensed milk until fully combined. Gently fold in the thawed whipped topping (Cool Whip), mixing carefully to maintain a light and fluffy texture.
- Pour Filling Over Cake: Slowly pour or spoon the creamy pudding mixture evenly over the cake. Make sure it seeps into all the poke holes and covers the surface completely, allowing maximum absorption of flavors.
- Chill and Apply Toppings: Cover the cake tightly with plastic wrap and refrigerate for at least 2 hours to allow the filling to set properly. Before serving, sprinkle the top generously with chopped Butterfinger candy bars to add a delightful crunchy texture. Optionally, drizzle peanut butter and caramel sauce over the top for extra flavor.
Notes
- For extra richness, you can brush the cake base with melted butter and sprinkle a little sugar before baking.
- Use either chocolate or vanilla pudding and cake mix based on your flavor preference.
- Ensure the cake is still warm when poking holes so the batter is firm but soft enough for the filling to seep in.
- Chill the cake for at least 2 hours, but overnight refrigeration enhances the flavors even more.
- The peanut butter and caramel drizzle are optional but add a delicious finishing touch.
- Store leftovers covered in the refrigerator and consume within 3-4 days for best taste.

