
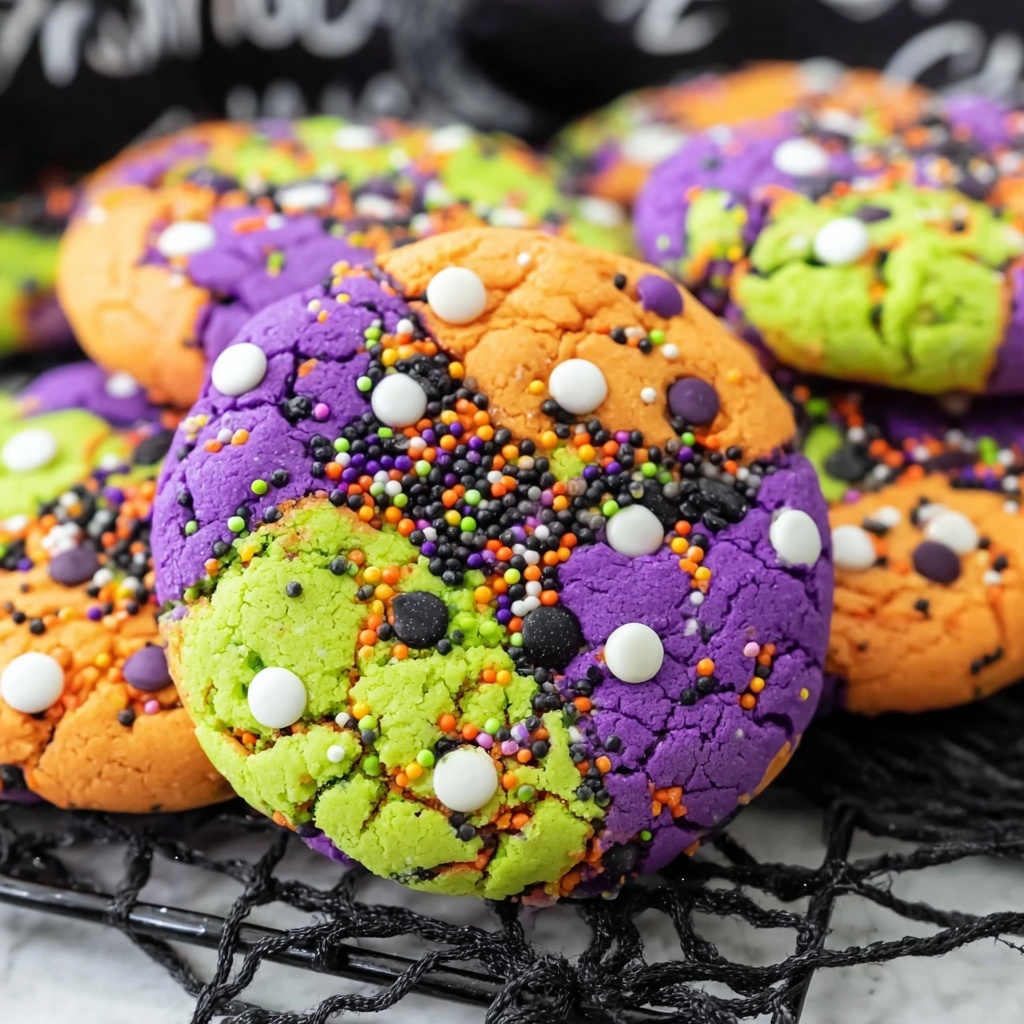
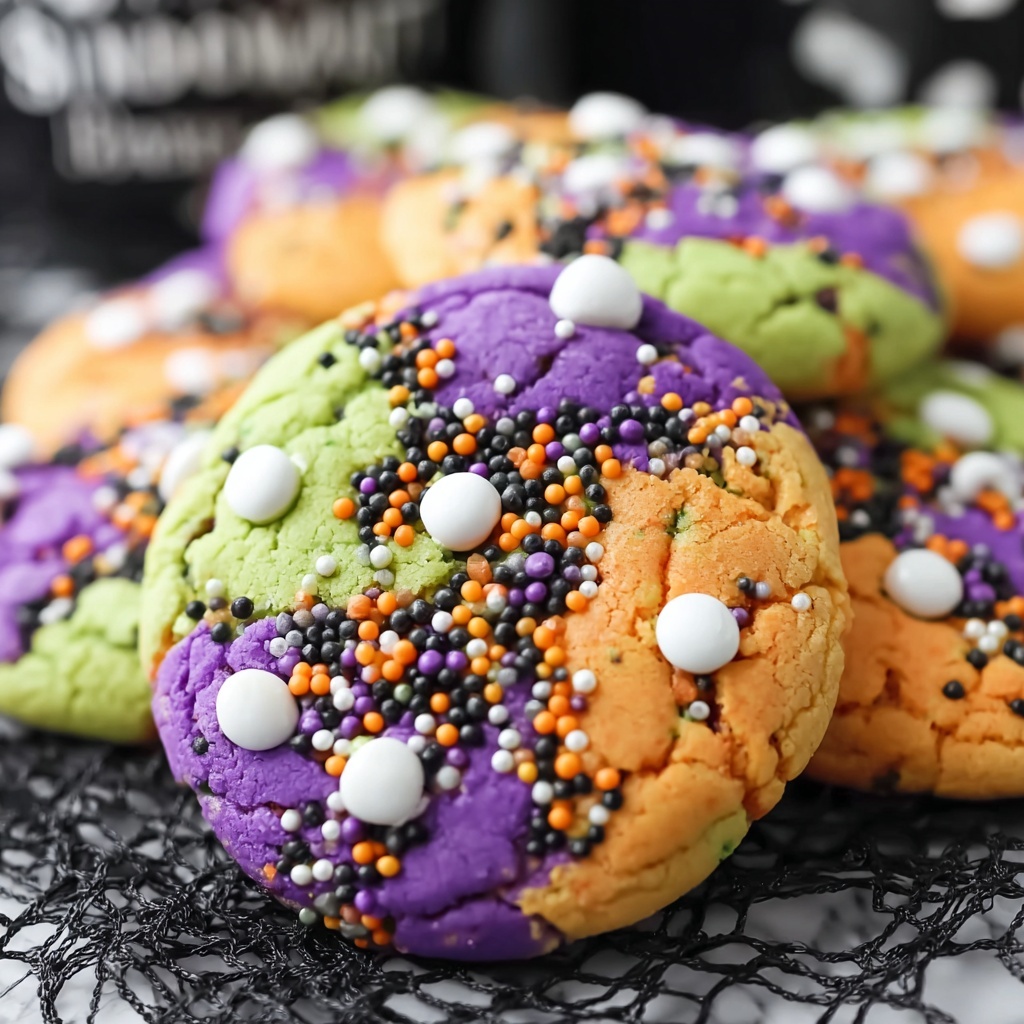
If you’re looking for a playful twist on classic cookies to wow your friends and family, the Hocus Pocus Cookies Recipe is an absolute must-try. These magical treats combine vibrant neon colors, rich white chocolate chips, and festive Halloween sprinkles to create a delightfully chewy and flavorful cookie that’s as fun to make as it is to eat. Each bite delivers a burst of sweetness and a hint of vanilla that feels like a little bit of enchantment on your taste buds. Whether you’re gearing up for a spooky party or just want a colorful cookie that impresses, this recipe brings joy and a little magic to your kitchen.
Ingredients You’ll Need
Getting started with the Hocus Pocus Cookies Recipe is a breeze because it calls for straightforward, pantry-friendly ingredients that each add something special. From the rich creaminess of cold butter to the vibrant pop of neon gel food dyes, these components work in perfect harmony to bring out the ideal texture, flavor, and eye-catching color.
- Cold Unsalted Butter (1 ½ cup, cut into cubes): Keeping the butter cold helps create that tender, flaky cookie texture.
- White Sugar (2 cups): Provides just the right amount of sweetness and contributes to the cookie’s delightful crisp edges.
- Eggs (2 large, room temperature): Eggs bind everything together while adding moisture for chewiness.
- Pure Vanilla Extract (3 teaspoons): Adds warmth and a lovely aromatic depth that highlights the cookie’s flavor.
- Cake Flour (2 cups): Helps ensure the cookies stay soft and tender with a delicate crumb.
- All-purpose Flour (2 ½ cups): Provides structure and balance to the dough.
- Cornstarch (1 ½ teaspoons): Keeps the cookies soft by reducing gluten formation.
- Baking Soda (1 ½ teaspoons): Ensures a light rise and that perfect chewy texture.
- Salt (¾ teaspoon): Enhances all the flavors and balances the sweetness.
- Gel Food Dye (Neon Green, Neon Purple, Neon Orange): These vivid colors bring the magical spirit to life.
- White Chocolate Chips (3 cups): Add creamy bursts of sweet goodness throughout each bite.
- Halloween Sprinkles (2 cups): For that fun, festive crunch and extra color pop on the edges.
How to Make Hocus Pocus Cookies Recipe
Step 1: Mix the Dry Ingredients
Start by whisking together the all-purpose flour, cake flour, cornstarch, baking soda, and salt in a large bowl. This blend forms the backbone of your cookie dough, ensuring the perfect balance of structure and softness once baked. Set it aside so you’re ready to combine it with your wet ingredients.
Step 2: Prepare Your Mix-Ins
Place the white chocolate chips in a medium bowl and the Halloween sprinkles in a small bowl for easy access later. It’s a simple step that gets you organized and ready for the fun part — mixing the dough and decorating the cookies.
Step 3: Cream Butter and Sugar
Using a stand mixer, beat the cold butter cubes and white sugar on high speed until the mixture is light and fluffy. This crucial step aerates the dough, giving the cookies their tender crumb and lovely texture.
Step 4: Incorporate Eggs
Slowly add the eggs one at a time, making sure the first is fully mixed before adding the second. This ensures your dough is smooth and well combined without any separation. It’s like building a strong foundation—essential for the best results.
Step 5: Add Vanilla Extract
Pour in the pure vanilla extract and blend it with the dough. This not only enhances flavor but also gives your cookies a warm, inviting aroma that fills the kitchen with happiness.
Step 6: Combine Wet and Dry Ingredients
Now, add the dry ingredient mixture to the wet ingredients one cup at a time on medium speed. Take your time to fully incorporate everything so your dough is consistent and ready for chilling.
Step 7: Chill the Dough
Cover your dough and pop it into the refrigerator for 30 minutes. This step firms up the dough, making it easier to handle and helping the cookies bake evenly without spreading too much.
Step 8: Preheat the Oven and Prep Baking Sheets
Once chilled, preheat your oven to 420 degrees Fahrenheit and line two cookie sheets with parchment paper or baking mats. The high heat helps create perfectly golden edges while keeping the centers soft.
Step 9: Divide and Color the Dough
Divide the dough into three equal parts, placing each into separate medium bowls. Mix a few drops of gel food dye into each one — neon purple, neon orange, and neon green. Stir until you achieve rich, vibrant colors that scream festive fun.
Step 10: Shape the Cookies
Grab a tablespoon of each colored dough, roll each into a ball, then gently press the trio together. Roll the combined dough ball in white chocolate chips and then coat the edges in Halloween sprinkles. Shape it into a thick disc and place it on your prepared baking sheet, leaving space for the cookies to spread.
Step 11: Bake to Perfection
Bake for 12-14 minutes, keeping a close eye to avoid overbaking. The cookies should be just set with golden edges and soft centers that practically melt in your mouth. Repeat with the second baking sheet for the best batch.
Step 12: Cool and Enjoy
Allow the cookies to cool slightly before serving. This brief wait lets them set perfectly, so you get that ideal chewy texture combined with crispy edges and pockets of sweetness.
How to Serve Hocus Pocus Cookies Recipe
Garnishes
These cookies shine on their own, but if you want to elevate the presentation, sprinkle some extra Halloween confetti or edible glitter on top just after baking. A dusting of powdered sugar can also add a whimsical, magical touch.
Side Dishes
Serve your Hocus Pocus Cookies alongside a glass of cold milk or a cozy cup of warm chai latte. The creamy beverages pair beautifully with the sweet white chocolate and the festive spice accents in these cookies.
Creative Ways to Present
For party magic, arrange these cookies on a spooky-themed platter with mini pumpkins, faux cobwebs, or themed cupcake liners. You can even stack them with thin layers of frosting or wrapped in colorful cellophane tied with a ribbon for delightful gifts.
Make Ahead and Storage
Storing Leftovers
Keep leftover cookies fresh by storing them in an airtight container at room temperature. They stay deliciously soft and chewy for up to 5 days, making them perfect for a sweet treat anytime.
Freezing
If you want to enjoy this magic later, freeze unbaked dough balls individually on a tray, then transfer them to a freezer bag. When ready, bake directly from frozen, just add a minute or two to the baking time for fresh-baked goodness anytime.
Reheating
Warm cookies for a few seconds in the microwave or oven to revive their fresh-from-the-oven softness. Reheating really brings out the gooey white chocolate and makes the neon colors pop even more.
FAQs
Can I substitute the cake flour with more all-purpose flour?
While you can swap cake flour for all-purpose flour, the cookies might turn out a little denser because cake flour has less protein, which keeps the cookies softer. For best results, try to use the combination as suggested.
Why is the butter cold instead of softened?
Using cold butter helps create a thicker, chewier cookie with a tender crumb. It slows the spreading of the dough during baking, so you get that perfect spider-web pattern of edges and gooey centers.
Can I use regular food coloring instead of gel?
Gel food dyes are preferred because they don’t thin out the dough or affect the texture. Regular liquid food coloring might make the dough more sticky and harder to handle, so gel is your best bet for vibrant colors and easy shaping.
Is it okay to mix the dough colors together instead of layering them?
The magic of this recipe is in those vibrant, distinct neon patches. Mixing the colors fully will create a blended hue rather than bright, separate colors. For best visual impact, keep the dough colors separate as instructed.
What if I don’t have Halloween sprinkles?
No worries! You can swap with any fun-colored sprinkles or even chopped nuts to add texture. The sprinkles add festive flair, but the cookies will still be delicious either way.
Final Thoughts
There’s something truly enchanting about the Hocus Pocus Cookies Recipe that makes baking it an absolute joy and eating it a pure delight. Bringing bold colors, rich flavors, and festive fun together, these cookies are a treat everyone will love. So gather your ingredients, get a splash of neon, and create a batch of magical cookies that will charm kids and adults alike. You’ll wonder how you ever celebrated without them!
Print
Hocus Pocus Cookies Recipe
- Prep Time: 20 minutes
- Cook Time: 14 minutes
- Total Time: 1 hour 4 minutes
- Yield: 16 servings
- Category: Dessert
- Method: Baking
- Cuisine: American
Description
Hocus Pocus Cookies are a fun and festive Halloween treat featuring colorful dough balls made with cake and all-purpose flours, infused with neon gel food dyes, studded with white chocolate chips, and coated in vibrant Halloween sprinkles. These visually striking cookies offer a delightful balance of sweetness and texture, perfect for parties or seasonal celebrations.
Ingredients
Dry Ingredients
- 2 cups All-purpose Flour
- 2 cups Cake Flour
- 1 ½ teaspoons Cornstarch
- 1 ½ teaspoons Baking Soda
- ¾ teaspoons Salt
Wet Ingredients
- 1 ½ cups Cold Unsalted Butter, cut into cubes
- 2 cups White Sugar
- 2 large Eggs, room temperature
- 3 teaspoons Pure Vanilla Extract
Add-ins and Decorations
- Gel Food Dye: Neon Green, Neon Purple, Neon Orange
- 3 cups White Chocolate Chips
- 2 cups Halloween Sprinkles
Instructions
- Mix Dry Ingredients: In a large mixing bowl, whisk together all-purpose flour, cake flour, cornstarch, baking soda, and salt until fully combined. Set aside.
- Prepare Add-ins: Place white chocolate chips in a medium bowl and Halloween sprinkles in a small bowl; set both aside for later use.
- Cream Butter and Sugar: Using a stand mixer, beat cold butter cubes and white sugar on high speed until the mixture is light and fluffy, approximately 3-5 minutes.
- Add Eggs: Add the first egg to the sugar mixture and beat until fully incorporated before adding the second egg. Continue mixing until the eggs are completely combined.
- Add Vanilla Extract: Pour in the vanilla extract and mix thoroughly to incorporate it into the wet ingredients.
- Combine Dry and Wet Ingredients: Add the dry flour mixture to the wet ingredients one cup at a time, mixing on medium speed until the dough is fully combined after each addition.
- Chill Dough: Cover the dough and refrigerate for 30 minutes to firm up for easier handling.
- Preheat Oven and Prep Sheets: Preheat your oven to 420°F (215°C) and line two cookie sheets with parchment paper or baking mats.
- Divide and Color Dough: Divide the chilled dough evenly into three medium bowls. Add a few drops of neon purple gel food dye to one bowl, neon orange to the second, and neon green to the third. Mix each until the color is even and vibrant.
- Form Colored Dough Balls: Scoop a tablespoon of each colored dough into your hands, rolling into small balls. You should have one ball for each color.
- Combine Colored Balls: Press the three colored dough balls together and roll them into one large ball, blending the colors slightly.
- Coat Dough Ball: Roll the combined dough ball first in the white chocolate chips, ensuring the surface is covered, then gently press the edges into the Halloween sprinkles for a festive coating.
- Shape Cookies: Press the coated dough ball lightly into a thick disc shape. Place the shaped cookies onto the prepared baking sheets, spacing them at least 2 inches apart to allow for spreading.
- Bake: Bake one sheet at a time in the oven for 12-14 minutes, watching closely to prevent overcooking. The cookies should be set and slightly golden around the edges.
- Cool and Serve: Remove the cookies from the oven and allow them to cool slightly on the baking sheets before transferring to a wire rack or serving plate.
Notes
- Using cold butter helps create a tender, flaky texture in the cookies.
- Room temperature eggs ensure even mixing and better texture.
- Be careful not to overbake; cookies should be soft in the center when removed.
- Feel free to swap sprinkles for any seasonal variety to match different occasions.
- Gel food dyes provide vibrant colors without altering dough consistency.
