
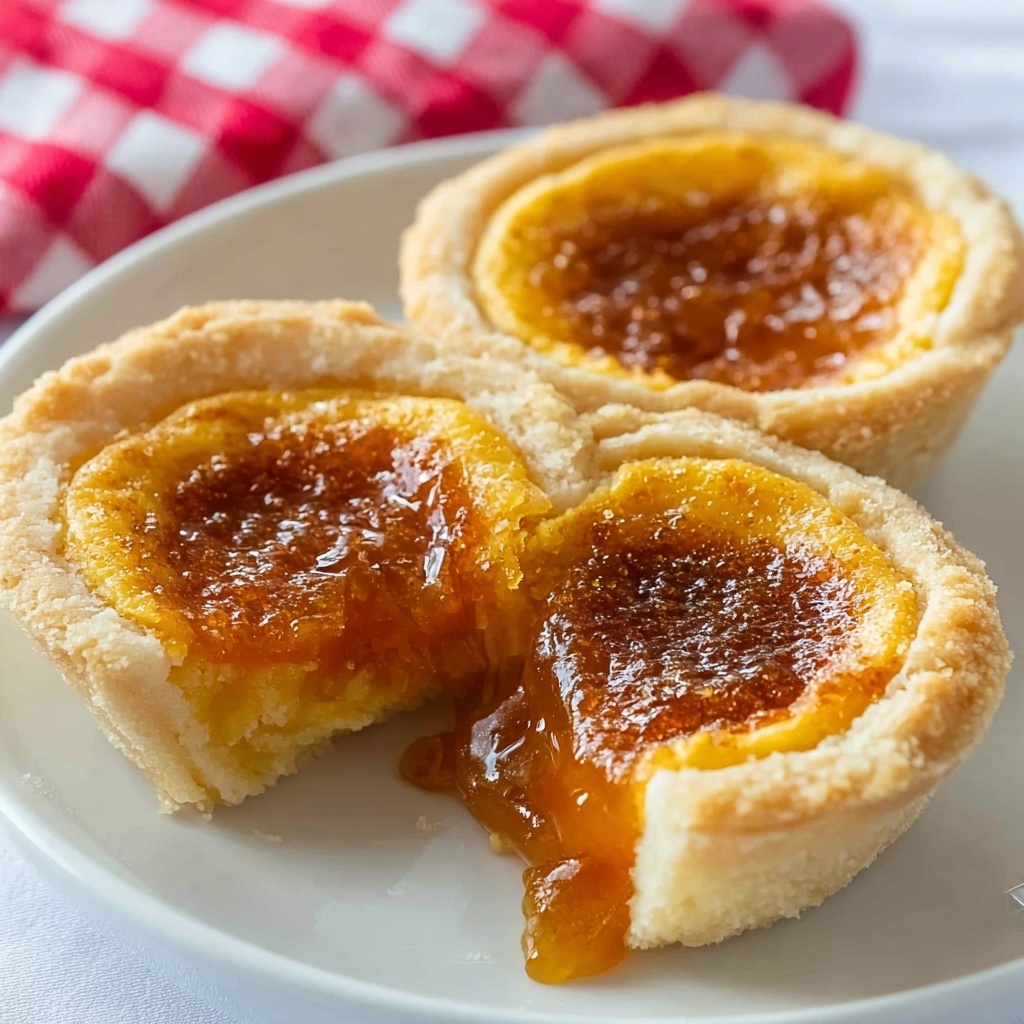
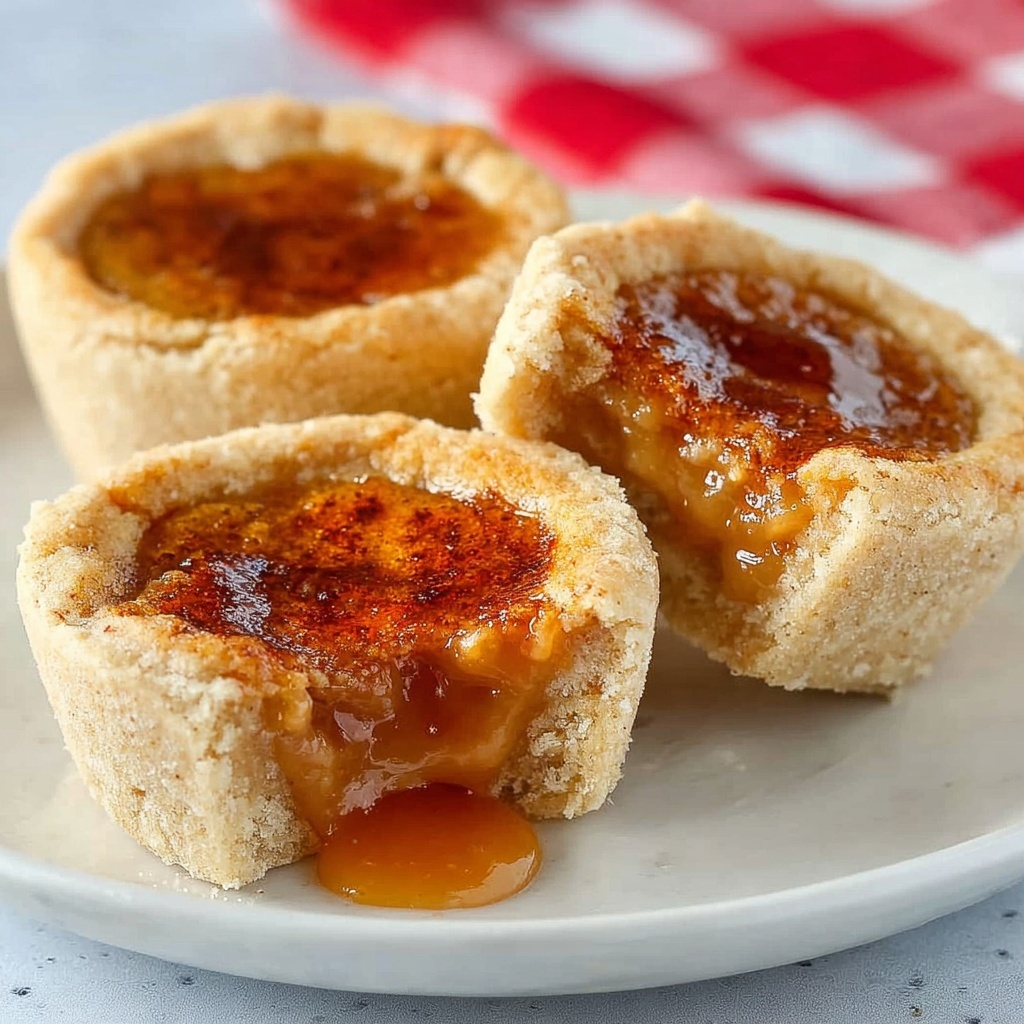
If you have a sweet spot for old-fashioned, delightful treats, then you are in for a real treat with The Best Classic Canadian Butter Tarts Recipe. This recipe brings together a perfectly flaky, buttery crust and a gooey, caramel-like filling studded with plump raisins (or your favorite mix-ins). It’s a dessert that captures the heart of Canadian baking traditions, with each bite melting in your mouth and sending you straight to comfort food heaven. Whether you enjoy them fresh from the oven or cooled to room temperature, these butter tarts offer the ultimate balance of sweet, rich, and slightly chewy goodness that make them truly unforgettable.
Ingredients You’ll Need
The beauty of The Best Classic Canadian Butter Tarts Recipe lies in its simplicity and the thoughtful choice of ingredients. Each one plays a crucial role in crafting the perfect texture and flavor, from the tender, flaky crust to the luscious, sweet filling.
- 1/2 cup lightly packed brown sugar: Provides a deep caramel flavor and adds moisture to the filling.
- 1/2 cup corn syrup: Gives the filling a sticky, glossy texture that sets just right.
- 1/4 cup butter, melted: Adds richness and helps create that luscious mouthfeel in the filling.
- 1 egg: Acts as a binder in the filling and lends a subtle golden color.
- 1 tsp vanilla extract: Enhances the sweetness and adds a lovely aroma.
- 1/4 tsp salt: Balances out the sweetness for a more complex taste.
- ½ cup raisins (optional): Classic chewy texture, but pecans, walnuts, or chocolate chips are exciting variations to try.
- 2 ¼ cups flour: Pastry flour is ideal for a tender crust, but all-purpose works well too.
- 1 tbsp brown sugar: A small touch for the crust, contributing to subtle sweetness and color.
- ½ tsp salt: Elevates the flavor of the pastry crust.
- 1/2 cup shortening, very cold and cubed: Essential for flakiness by creating layers in the dough.
- 1/2 cup butter, very cold and cubed: Works with shortening for tender, golden crust.
- 6 tbsp ice water (approximately): Just enough to bring the dough together without making it tough.
How to Make The Best Classic Canadian Butter Tarts Recipe
Step 1: Make the Pastry Dough
Begin by pulsing the cold butter and shortening into the flour, brown sugar, and salt in a food processor. You want pea-sized pieces of fat interspersed throughout the flour, which is the secret to a perfectly flaky crust. Next, sprinkle the ice water over the dry mixture, tossing gently with a fork to bring the dough together. Be gentle and avoid overworking it – the less you handle the dough, the lighter and flakier the crust will turn out.
Step 2: Resting and Rolling Out the Dough
Form the dough into two flat rounds about an inch thick, then wrap up those rounds tightly in plastic wrap. Pop them into the fridge for about 30 minutes to let the dough relax and the fats firm up again. Once chilled, roll the dough out on a lightly floured surface to about 1/8 inch thickness. Use a 4-inch round cutter to cut out circles and carefully fit them into muffin cups, creating a cozy home for your luscious filling. Chill the crust-lined pans in the fridge or freezer while you prepare the filling – this cold start is what gives you that extra flaky texture after baking.
Step 3: Prepare the Filling
In a mixing bowl, combine the brown sugar, corn syrup, melted butter, egg, vanilla extract, and salt. Whisk everything until smooth and glossy – this is going to be the sweet ooze that defines your butter tarts. Resist the temptation to add the raisins or your desired mix-ins just yet; these come next.
Step 4: Assemble the Butter Tarts
Sprinkle the bottom of each chilled tart shell with raisins, ensuring they’re evenly distributed in a single layer. Now pour the syrupy filling mixture into each tart, filling them about two-thirds of the way full. This allows some room for the filling to bubble up and caramelize during baking without overflowing.
Step 5: Baking to Perfection
Place the assembled tarts on the bottom shelf of a preheated oven at 425 degrees F. Bake for 12 to 15 minutes until the crust edges are golden and the filling is bubbling and set but still slightly soft in the center. This baking stage is where the magic happens – the butter tarts puff up into golden little treasures that are slightly crisp on the outside and decadently gooey inside.
Step 6: Cooling and Removing from Pans
Once baked, transfer the tarts onto a wire rack and let them cool completely. Cooling allows the filling to set just right, so it won’t spill out when you bite into it. When cool, gently remove the tarts from their pans and prepare to enjoy or serve.
How to Serve The Best Classic Canadian Butter Tarts Recipe
Garnishes
While these tarts stand on their own, a light dusting of powdered sugar or a dollop of whipped cream can elevate their presentation and complement the rich sweetness. Fresh berries or a small sprig of mint also add a pop of color and a hint of freshness that balances the dessert’s richness.
Side Dishes
The Best Classic Canadian Butter Tarts Recipe pairs beautifully with a comforting cup of tea or coffee. If you want to turn it into a more extravagant dessert experience, serve with vanilla ice cream or a drizzle of caramel sauce. These pairings only deepen the pleasure of this classic treat, making it a fantastic finish to any meal.
Creative Ways to Present
If you’re feeling creative, try serving mini butter tarts on a dessert platter with assorted nuts and dried fruits, letting guests pick and choose their favorites. Or turn them into a tart tartlet tower for special occasions by stacking them with layers of whipped cream or fruit preserves in between. These presentation ideas add charm and a bit of wow-factor to an already unforgettable dessert.
Make Ahead and Storage
Storing Leftovers
If you find yourself lucky enough to have leftovers, store them in an airtight container at room temperature for up to 2 days to maintain the crust’s flakiness. For longer storage, keep them in the fridge, but expect the crust to soften slightly over time.
Freezing
The Best Classic Canadian Butter Tarts Recipe freezes wonderfully. Wrap each tart individually in plastic wrap and place in an airtight container or freezer bag. They can be frozen for up to 3 months. Thaw them overnight in the fridge before reheating.
Reheating
To bring your butter tarts back to their freshly baked glory, reheat in a preheated oven at 325 degrees F for 8 to 10 minutes. This helps crisp the crust again and gently warms the gooey filling without drying it out.
FAQs
Can I substitute the raisins with other ingredients?
Absolutely! While raisins are traditional, you can swap them for chopped pecans, walnuts, or chocolate chips depending on your taste. Each option brings a unique texture and flavor twist to the classic butter tart.
Is pastry flour necessary for the crust?
Pastry flour is recommended because it produces a more tender and flaky crust due to its lower protein content. However, all-purpose flour works just fine if that’s what you have on hand.
Why do the tarts sometimes get runny filling?
Runny filling can usually be traced back to underbaking or adding too much liquid. Make sure to fill the tarts only about two-thirds full and bake until the filling is setting but still slightly soft; it firms up more as it cools.
Can I make the dough and filling ahead of time?
Yes, the dough can be made and refrigerated for up to 24 hours before rolling and assembling. The filling can be mixed ahead as well but add the egg at the last minute to keep it fresh and ensure proper texture.
What makes this recipe the best classic Canadian butter tarts?
This recipe strikes the perfect balance of a flaky, buttery crust and a luscious, gooey filling with the ideal level of sweetness. The careful preparation steps and quality ingredients work together to recreate that authentic taste that Canadians have cherished for generations.
Final Thoughts
There’s something truly special about making The Best Classic Canadian Butter Tarts Recipe from scratch; it’s a wonderful way to connect with a delicious piece of culinary tradition that brings joy to any occasion. Whether you’re baking for family, friends, or just treating yourself, these tarts deliver irresistible flavor and texture with every bite. Give this recipe a try, and watch how quickly it becomes one of your all-time favorite desserts to bake and share.
Print
The Best Classic Canadian Butter Tarts Recipe
- Prep Time: 30 minutes
- Cook Time: 15 minutes
- Total Time: 45 minutes
- Yield: 12 servings
- Category: Dessert
- Method: Baking
- Cuisine: Canadian
Description
Classic Canadian Butter Tarts are a beloved sweet treat featuring a flaky pastry shell filled with a rich, gooey caramel-like filling made of brown sugar, corn syrup, butter, and eggs. This recipe creates a perfect balance of sweet and buttery flavors with the option to add raisins, nuts, or chocolate chips for added texture and taste. Make them for a traditional dessert that highlights the iconic Canadian delicacy.
Ingredients
Filling
- 1/2 cup lightly packed brown sugar
- 1/2 cup corn syrup
- 1/4 cup butter, melted
- 1 egg
- 1 tsp vanilla extract
- 1/4 tsp salt
- ½ cup raisins (substitute with pecans, walnuts, or chocolate chips if desired)
Pastry Dough
- 2 ¼ cups flour (pastry flour preferred, or all-purpose flour)
- 1 tbsp brown sugar
- ½ tsp salt
- 1/2 cup shortening, very cold and cut into cubes
- 1/2 cup butter, very cold and cut into cubes
- 6 tbsp ice water, approximately (enough to bring dough together)
Instructions
- Make the Pastry Dough: Pulse the cold butter and shortening into the flour, brown sugar, and salt using a food processor until the fat is reduced to pea-sized pieces, ensuring a flaky texture.
- Incorporate Water: Sprinkle the ice water over the mixture and toss lightly with a fork until the dough just comes together. Avoid overworking to prevent toughness.
- Shape and Chill: Form the dough into two rounds about one inch thick, wrap in plastic wrap, and chill in the refrigerator for 30 minutes to rest.
- Roll and Cut: On a lightly floured surface, roll out the chilled dough and cut into 4-inch rounds. Fit each round into muffin cups and chill again in the fridge or freezer to keep the pastry cold.
- Prepare Filling: In a mixing bowl, combine the brown sugar, corn syrup, melted butter, egg, vanilla extract, and salt. Mix well until smooth and homogenous.
- Assemble Tarts: Sprinkle the raisins evenly in the bottom of each pastry-lined muffin cup. Fill each cup about two-thirds full with the syrupy filling mixture.
- Bake: Place the muffin tin on the bottom shelf of a preheated oven at 425°F (220°C). Bake the tarts for 12 to 15 minutes until the filling is bubbly and the pastry crust is golden and flaky.
- Cool and Serve: Remove the tarts from the oven and cool completely on a wire rack. Once cooled, carefully remove from the pans and serve.
Notes
- Using pastry flour instead of all-purpose flour will create a more tender and flaky crust.
- Keeping the butter and shortening very cold is key to achieving a flaky pastry texture.
- Chilling the assembled tart shells before baking helps prevent shrinking and promotes a flaky crust.
- Variations include substituting raisins with chopped pecans, walnuts, or chocolate chips according to your preference.
- Butter tarts are best enjoyed the same day but can be stored in an airtight container for up to 2 days.
