
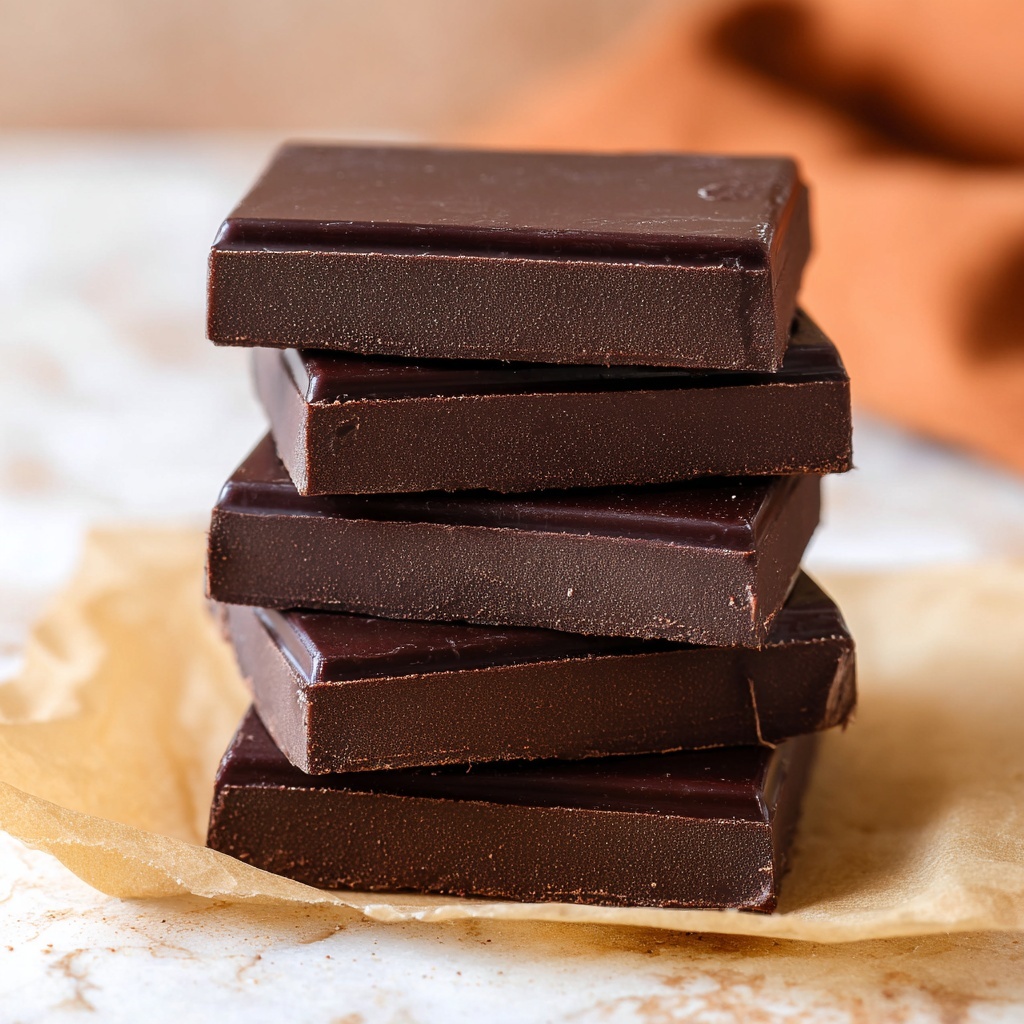
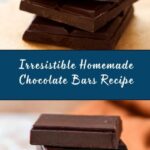
If you’ve ever craved something deeply chocolatey and satisfying, then this Irresistible Homemade Chocolate Bars Recipe is exactly what your sweet tooth needs. It’s a simple yet magical blend of dark chocolate, a hint of coconut oil for silkiness, and a touch of vanilla and sea salt to bring out every rich note. Whether you’re craving a quick treat or planning to impress friends with a homemade delight, these chocolate bars offer a luxurious experience that’s both elegant and easy to whip up in no time.

Ingredients You’ll Need
Don’t let the short list fool you — each ingredient plays a crucial role in making these chocolate bars stand out. From the deep, sophisticated bitterness of dark chocolate to the creamy smoothness that coconut oil adds, every element is essential for that perfect bite.
- 1 cup dark chocolate chips (70% cocoa): The star of the recipe, providing rich cacao flavor and a smooth melt.
- 2 tbsp coconut oil: Adds a silky texture and helps the chocolate set with a shiny finish.
- 1 tsp pure vanilla extract: Brings warmth and a subtle sweetness to balance the bitterness of chocolate.
- 1/2 tsp sea salt: Elevates the chocolate’s flavor by adding a touch of contrast and depth.
- Optional: 1/4 cup nuts or dried fruits (e.g., almonds, cranberries): Gives a lovely crunch or chewy burst for added texture and flavor complexity.
How to Make Irresistible Homemade Chocolate Bars Recipe
Step 1: Prepare Your Workspace
Start by clearing a clean space on your counter and gathering all your ingredients in one spot. Having everything within reach helps the whole process flow smoothly without any hiccups.
Step 2: Melt the Chocolate and Coconut Oil
Place the dark chocolate chips and coconut oil into a microwave-safe bowl. Microwave this mixture in 30-second bursts, stirring well between each interval until it is perfectly smooth and glossy. This method prevents the chocolate from burning and ensures a uniform melt.
Step 3: Enhance the Flavor
Once the chocolate mixture is melted, stir in the pure vanilla extract and sea salt. These little additions work magic by deepening the flavor and balancing the chocolate’s natural bitterness.
Step 4: Pour Into Molds
Carefully pour the chocolate mixture into silicone molds or onto a lined baking tray. Gently tap the molds or tray to release any trapped air bubbles, ensuring a smooth surface and even texture once set.
Step 5: Add Your Optional Extras
Sprinkle nuts or dried fruits on the surface if you like. This not only adds beautiful decoration but also brings delightful crunchy or chewy textures that contrast with the creamy chocolate.
Step 6: Chill Until Set
Place the filled molds or tray in the refrigerator for 1 to 2 hours. During this time, the chocolate will harden and develop that perfect snap we all love in a chocolate bar.
How to Serve Irresistible Homemade Chocolate Bars Recipe
Garnishes
Serving these homemade chocolate bars can be as simple or as fancy as you want. Consider sprinkling a pinch of sea salt flakes for a gourmet touch or a dusting of cocoa powder to intensify the chocolate experience right before serving.
Side Dishes
If you’re sharing these bars at a party or a cozy gathering, pair them with fresh berries or a scoop of creamy vanilla ice cream. The freshness and creaminess complement the dense chocolate beautifully.
Creative Ways to Present
Wrap individual bars in parchment paper tied with twine for an adorable gift or party favor. You could also layer chopped bars in a glass jar for a stylish display that invites guests to dig in.
Make Ahead and Storage
Storing Leftovers
Leftover bars keep wonderfully in an airtight container in the refrigerator. This helps maintain their texture and prevents any melting, keeping your chocolate fresh and delicious for up to two weeks.
Freezing
If you want to prepare in advance or store bars for longer, freezing is a great option. Wrap each bar tightly in plastic wrap, then place in a freezer-safe container. They’ll stay fresh for up to 3 months and thaw quickly at room temperature.
Reheating
Since these bars are crafted to be enjoyed chilled or at room temperature, reheating isn’t necessary. However, if you prefer a slightly mellower texture, let them sit out for a few minutes before indulging.
FAQs
Can I use milk chocolate instead of dark chocolate?
Absolutely! Using milk chocolate will make the bars sweeter and creamier, though the flavor won’t be as intense. Just be sure to adjust any additional sweeteners as needed.
Is it possible to make this recipe vegan?
Yes, as long as you use dairy-free dark chocolate chips and ensure your vanilla extract is vegan-friendly, this recipe can be completely plant-based.
What type of nuts work best in this recipe?
Almonds, hazelnuts, pecans, or walnuts all add wonderful crunch and flavor. Toasting the nuts lightly can boost their aroma and deepen the overall taste experience.
Can I add other flavorings or spices?
Definitely! Feel free to experiment with cinnamon, chili powder, or even a splash of espresso. These additions can make your homemade chocolate bars even more unique and exciting.
How long do these chocolate bars last at room temperature?
Since they contain coconut oil, it’s best to keep them refrigerated, especially in warmer climates, to prevent melting. At room temperature, they may soften or lose texture within hours.
Final Thoughts
Now that you know how simple it is to create these delectable treats, I wholeheartedly encourage you to dive into this Irresistible Homemade Chocolate Bars Recipe. Making chocolate from scratch at home not only tastes incredible but also fills your kitchen with that cozy, comforting aroma that’s simply unbeatable. Whether for a quick indulgence or a thoughtful gift, these bars are sure to become a beloved favorite.
Print
Irresistible Homemade Chocolate Bars Recipe
- Prep Time: 5 minutes
- Cook Time: 7 minutes
- Total Time: 12 minutes (+1-2 hours chilling time)
- Yield: 8 servings
- Category: Dessert
- Method: No-Cook
- Cuisine: American
- Diet: Vegetarian
Description
Craft your own delicious and customizable homemade chocolate bars with simple ingredients. Melted dark chocolate combined with coconut oil and enhanced with vanilla and sea salt creates a rich, smooth treat. Add nuts or dried fruits for texture and taste, then set in molds for a perfect sweet snack.
Ingredients
Chocolate Base
- 1 cup dark chocolate chips (70% cocoa)
- 2 tbsp coconut oil
- 1 tsp pure vanilla extract
- 1/2 tsp sea salt
Add-ins (Optional)
- 1/4 cup nuts or dried fruits (e.g., almonds, cranberries)
Instructions
- Prepare workspace: Clear your counter and gather all ingredients and tools needed for easy access during the process.
- Melt chocolate and coconut oil: Combine dark chocolate chips and coconut oil in a microwave-safe bowl. Microwave in 30-second intervals, stirring between each, until the mixture is fully melted and smooth.
- Add flavorings: Stir in the vanilla extract and sea salt into the melted chocolate for enhanced depth and balance of flavors.
- Pour into molds: Transfer the chocolate mixture into silicone molds or lined baking trays. Gently tap the molds to release any trapped air bubbles ensuring smooth bars.
- Add toppings: Sprinkle nuts or dried fruits on top if desired to add texture and extra flavor before the chocolate sets.
- Chill to set: Place the molds in the refrigerator and chill for 1 to 2 hours until the chocolate bars are firm and completely set.
Notes
- Use high-quality dark chocolate with at least 70% cocoa for best flavor and health benefits.
- Customize with your favorite nuts or dried fruits to create varied textures and tastes.
- Ensure to stir thoroughly while melting to avoid burning the chocolate.
- Silicone molds work best for easy removal of the bars.
- Store homemade chocolate bars in an airtight container in the refrigerator to maintain freshness.

