
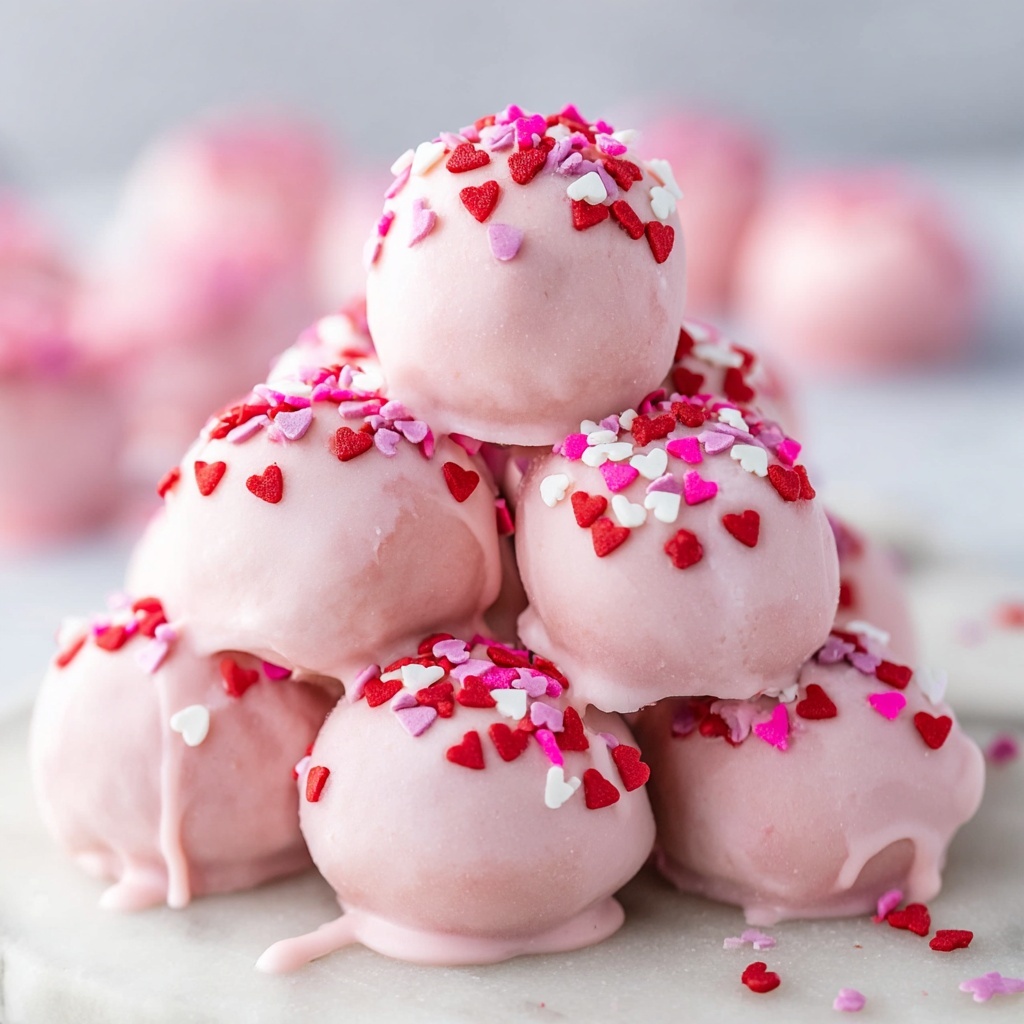
If you are looking for the perfect sweet treat to wow your special someone, this Valentine’s Oreo Truffles Recipe is an absolute game-changer. Imagine creamy, tangy cream cheese blended with the irresistible crunch of golden Oreo cookies, dipped in luscious vanilla candy coating, and finished off with cheerful Valentine sprinkles—each bite melts in your mouth like a little celebration. It’s simple yet elegant, and ideal for sharing or gifting, making it the ultimate dessert to spread love and sweetness on Valentine’s Day or any day you want to make special.

Ingredients You’ll Need
The magic of this Valentine’s Oreo Truffles Recipe lies in the simplicity of its ingredients. Each one plays a crucial role—from the buttery crumbs of golden Oreos, the silky cream cheese for richness, to the vanilla candy coating adding both flavor and a gorgeous finish. Plus, the pink food coloring and festive sprinkles bring that perfect Valentine’s flair.
- Golden Oreo cookies: These provide a delicate crunch and subtle sweetness, forming the base crumb mixture.
- Cream cheese (6 ounces, room temperature): Adds creamy richness and helps bind the crumbs together smoothly.
- Pink food coloring (about 20 drops): This gives your truffles a lovely rosy hue perfect for Valentine vibes; adjust as you like.
- Vanilla candy coating (16 ounces): Melts to a silky shell that hardens beautifully, sealing in flavors and creating a delightful texture contrast.
- Favorite Valentine sprinkles: These playful decorations add color, texture, and a fun festive touch to your truffles.
How to Make Valentine’s Oreo Truffles Recipe
Step 1: Crush the Golden Oreos
Start by placing 36 Oreo cookies into a food processor to grind them into fine crumbs. If you don’t have a processor, no worries—put them in a sealed bag and crush thoroughly with a rolling pin. This creates the crumbly, flavorful base for your truffles and sets the stage for that soft yet textured bite everyone loves.
Step 2: Mix Crumbs with Cream Cheese and Food Coloring
Transfer the Oreo crumbs into a mixer or back into the food processor bowl and add 6 ounces of room temperature cream cheese along with 10 drops of pink food coloring. Blend thoroughly until you have a smooth, consistent mixture that’s tacky enough to hold its shape when rolled. If it feels too soft, add more crumbs gradually—getting this right is key for perfect truffles.
Step 3: Shape the Truffles
Using a small ice cream scoop, melon baller, or even a rounded teaspoon, scoop out uniform amounts of the mixture. Roll each scoop between your palms into a firm 1 1/4 inch ball—perfectly round and satisfying to make! Pop the rolled balls onto a parchment-lined cookie sheet and then chill them in the freezer to firm up while you prepare the coating.
Step 4: Prepare the Vanilla Candy Coating
Break up the 16 ounces of vanilla candy coating into pieces and place them in a microwave-safe bowl. Heat in 20-second bursts, stirring gently between each, until fully melted and silky smooth. This quick step ensures your coating dips evenly and hardens with a shiny finish.
Step 5: Dip and Decorate the Truffles
One by one, carefully dip the chilled truffle balls into the warm vanilla coating using a fork or dipping tool. Let the excess coating drip off by tapping lightly against the bowl’s edge. Place dipped truffles back on the parchment paper, and while the coating is still soft, sprinkle on your favorite Valentine-themed sprinkles. This adds charm and a dash of crunch to every bite.
Step 6: Chill and Set
After all the truffles are dipped and decorated, transfer the tray to the refrigerator for at least 15 minutes. This chilling step sets the candy coating firmly, so when you serve your Valentine’s Oreo Truffles Recipe, they have that perfect snap and creamy inside texture.
How to Serve Valentine’s Oreo Truffles Recipe
Garnishes
While the festive sprinkles are a classic choice, you can also get creative with fine chopped nuts, edible glitter, or a drizzle of contrasting colored candy melts. These small details elevate the truffles and show off your personalized touch.
Side Dishes
These truffles pair beautifully with a cup of rich hot chocolate, a fresh berry salad, or a glass of sparkling wine for a refined dessert experience. Their versatility means they can complement anything from casual movie nights to romantic dinners.
Creative Ways to Present
Arrange your Oreo truffles in mini cupcake liners inside a pretty box, place them on decorative trays surrounded by rose petals, or even stack them in a clear jar tied with a satin ribbon for thoughtful gifting. Presentation is half the joy and makes this Valentine’s Oreo Truffles Recipe irresistible before even taking a bite.
Make Ahead and Storage
Storing Leftovers
Keep any leftover truffles in an airtight container in the refrigerator. They stay fresh and delicious for up to one week, making them a convenient treat to enjoy anytime.
Freezing
You can freeze these truffles for up to two months by placing them in a single layer on a baking sheet, freezing until solid, then transferring to a sealed container or freezer bag. Thaw in the fridge overnight before serving for the best texture.
Reheating
Truffles are best enjoyed chilled or at room temperature, so simply remove from the fridge about 15 minutes before eating. Avoid microwaving as it can melt the coating and change the texture.
FAQs
Can I use regular Oreo cookies instead of golden Oreos?
Absolutely! Classic Oreo cookies will work just fine and will give your truffles a darker, chocolatey flavor. The golden Oreos provide a lighter, vanilla twist, but both are delicious options.
How do I know if the mixture is the right consistency for rolling?
The mixture should be sticky enough to hold together in a firm ball without crumbling. If it feels too wet, add more Oreo crumbs. If it’s too dry, a bit more cream cheese can help. It takes a little trial, but you’ll soon get the feel.
Can I substitute the cream cheese for something else?
Cream cheese provides essential creaminess and binding, but for a dairy-free alternative, you might try a soft vegan cream cheese. Keep in mind it may affect texture and flavor slightly.
What if I don’t have candy coating? Can I use chocolate chips?
You can melt chocolate chips as a substitute, but adding a little vegetable oil or shortening helps create the smooth, firm coating we want. Vanilla candy coating is convenient because it hardens nicely and has a sweet vanilla taste.
How far ahead can I make these truffles before serving?
You can make these truffles up to 3 days in advance and store them in the refrigerator. Just bring them to room temperature before serving to enjoy the best texture and flavor.
Final Thoughts
There’s nothing quite like the joy of making sweets that are as charming as they are delicious, and this Valentine’s Oreo Truffles Recipe fits the bill perfectly. Whether you’re treating yourself, surprising a loved one, or bringing something special to a party, these truffles are sure to bring smiles and sweet moments. Give this recipe a go, and watch how quickly they disappear—love in every bite!
Print
Valentine’s Oreo Truffles Recipe
- Prep Time: 20 minutes
- Cook Time: 15 minutes
- Total Time: 35 minutes
- Yield: 24 servings
- Category: Dessert
- Method: No-Cook
- Cuisine: American
Description
These Valentine’s Oreo Truffles are a delightful and festive treat made with golden Oreo cookies, cream cheese, and a sweet vanilla candy coating. Perfectly pink and topped with colorful Valentine sprinkles, these no-bake truffles are quick to prepare and ideal for sharing at parties or gifting to loved ones.
Ingredients
Truffle Base
- 36–42 golden Oreo cookies
- 6 ounces cream cheese, room temperature
- 10 drops pink food coloring (divided)
Coating and Decoration
- 16 ounces vanilla candy coating
- Favorite Valentine sprinkles
- Additional 10 drops pink food coloring (to adjust color)
Instructions
- Prepare Oreo Crumbs: Place 36 golden Oreo cookies in a food processor or a sealed bag and crush them into fine crumbs.
- Mix Oreo Crumbs and Cream Cheese: Transfer the Oreo crumbs into a mixer or leave them in the food processor and add softened cream cheese along with 10 drops of pink food coloring. Mix thoroughly until the mixture sticks together well. Add more cookie crumbs if the mixture is too soft.
- Form the Truffle Balls: Using a small ice cream scoop, melon baller, rounded teaspoon, or candy scoop, portion out uniform amounts of the mixture. Roll each portion between your palms into a firm 1 1/4 inch ball and place them on a parchment-lined cookie sheet. Repeat until all mixture is used, yielding about 24 truffles.
- Freeze the Balls: Place the rolled balls in the freezer to chill while preparing the candy coating.
- Melt Candy Coating: Break up the vanilla candy coating and place it in a microwave-safe bowl. Microwave in 20-second intervals, stirring between each, until the coating is smooth and fully melted, approximately 1-2 minutes.
- Dip the Truffles: Using a fork or dipping tool, dip each truffle ball into the melted candy coating, ensuring it is fully covered. Gently drag the bottom of the coated truffle against the bowl’s edge to remove excess coating.
- Decorate the Truffles: Place the coated truffles back on the parchment-lined tray and immediately sprinkle with favorite Valentine-themed sprinkles while the coating is still soft.
- Repeat Dipping and Decorating: Continue dipping and decorating all truffles until done.
- Set the Coating: Return the tray to the refrigerator and chill for at least 15 minutes to allow the candy coating to harden.
- Serve: Once set, serve the truffles at room temperature for the best taste and texture. Enjoy your Valentine’s treat!
Notes
- Ensure cream cheese is properly softened before mixing for smooth blending.
- If the mixture feels too wet or sticky, add more crushed Oreos until firm enough to roll.
- Use a small ice cream scoop or melon baller for uniform truffle size and even coating.
- Keep truffles refrigerated until ready to serve to maintain firmness.
- For a more intense pink color, adjust the amount of pink food coloring accordingly.
- These truffles can be stored in an airtight container in the refrigerator for up to one week.


