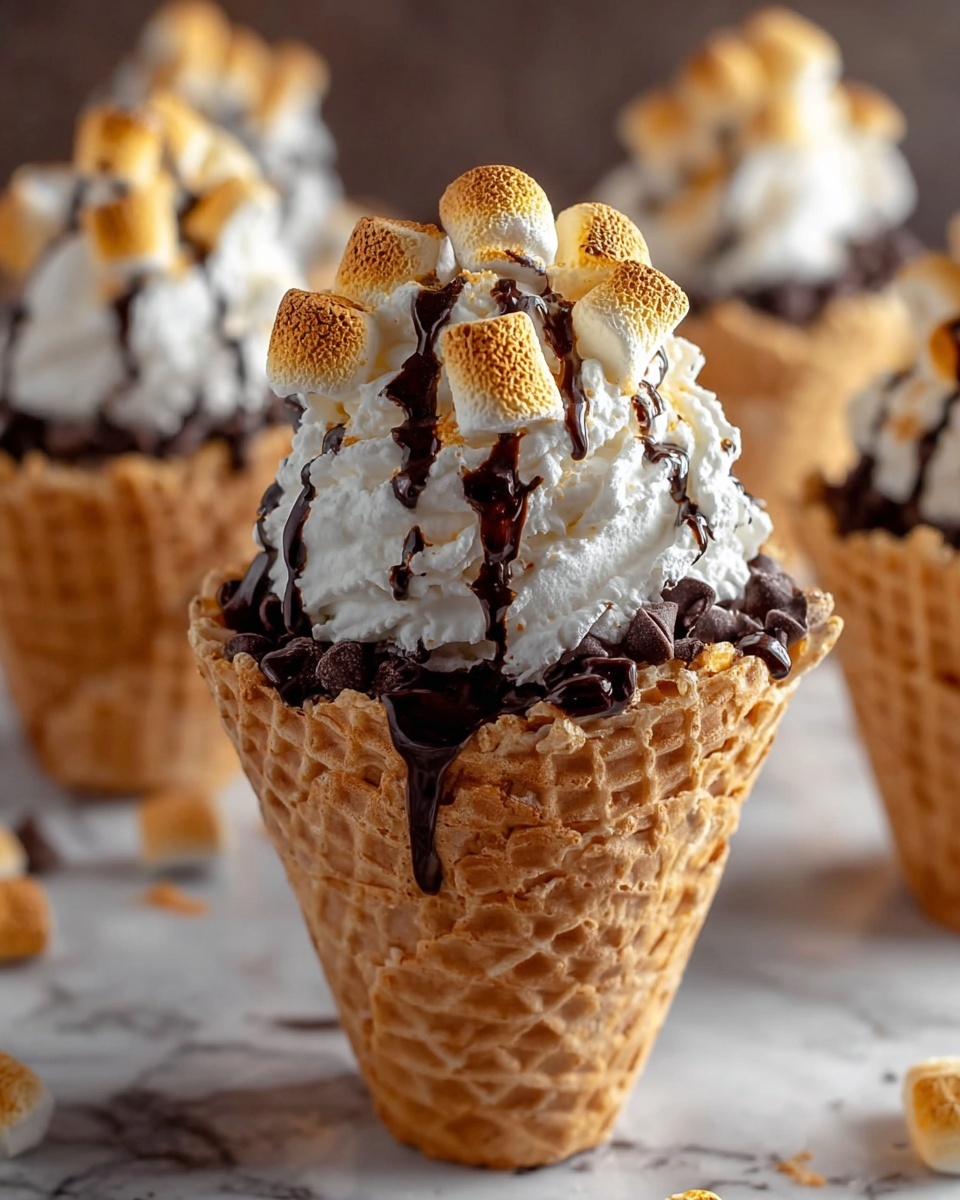
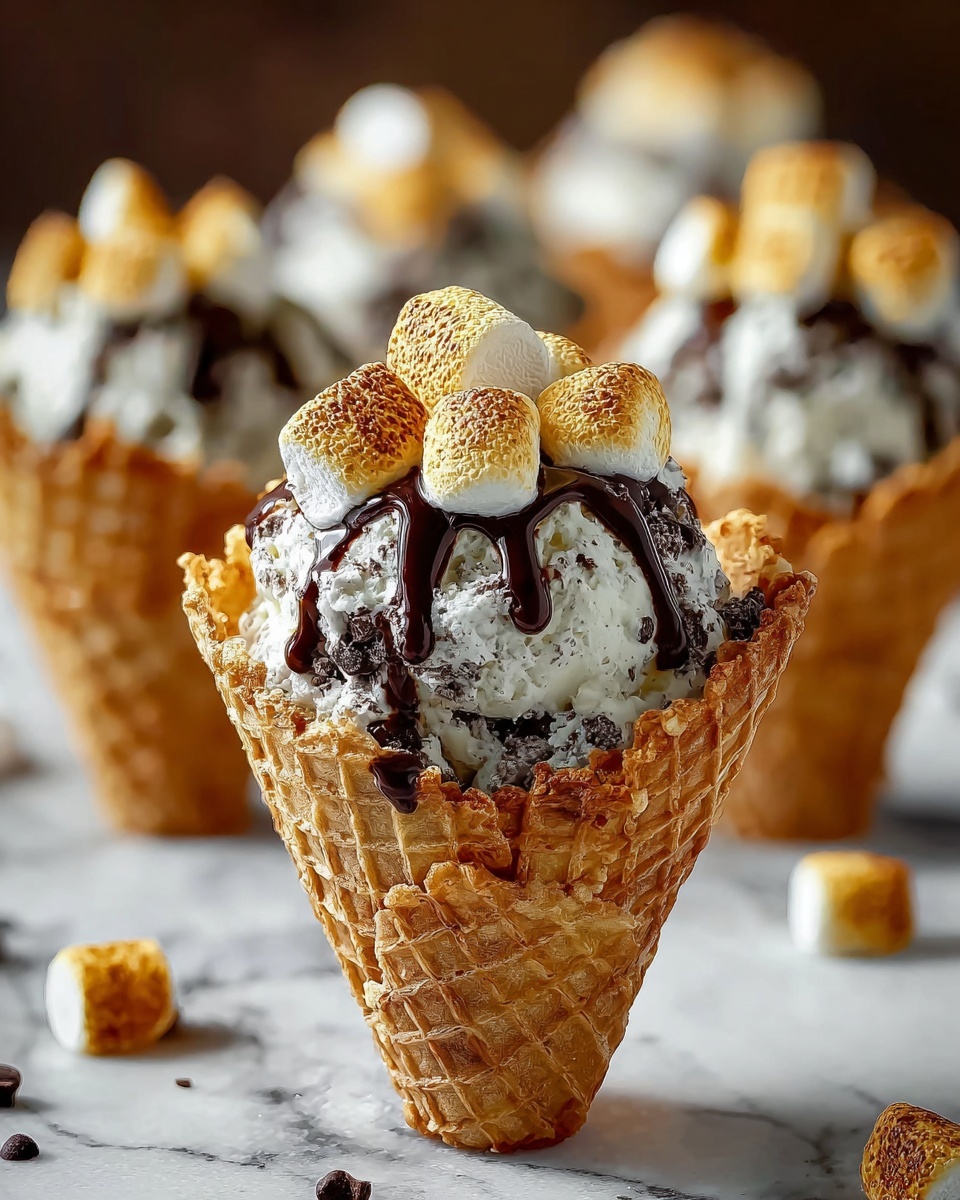
If you’re looking for a fun and utterly delicious treat that brings a nostalgic campfire feeling right to your backyard or kitchen, this Reese’s Campfire Cones Recipe is exactly what you need. Imagine a crispy waffle cone loaded with melty mini Reese’s peanut butter cups, soft toasted marshmallows, and rich chocolate chips all melted together to create a gooey, dreamy dessert that’s perfect for sharing. It’s simple to make, irresistibly sweet, and guaranteed to be a new favorite whenever you crave that warm, cozy sweet bite any time of year.
Ingredients You’ll Need
The beauty of this Reese’s Campfire Cones Recipe is how simply delightful the ingredients are, each playing a crucial role in texture and flavor without requiring any complicated preparations. Every bite balances crispy, creamy, chocolatey, and nutty notes that work perfectly together in a handheld treat.
- 6 to 8 Waffle Cones: These serve as the sturdy yet crispy vessel to hold all the melty goodness inside.
- 12 to 16 Mini Reese’s Peanut Butter Cups: The star ingredient that adds that unmistakable peanut butter and chocolate magic.
- 1 cup Mini Marshmallows: These melt to a soft, gooey texture that makes the cones irresistible.
- 1/2 cup Chocolate Chips: Adds extra bursts of chocolate throughout to deepen the flavor.
- Chopped Nuts (peanuts or walnuts): Optional for adding a crunchy texture contrast and nutty richness.
- Crushed Cookies: Adds sweetness and a different kind of crunch to the top if you like a little extra texture.
- Sprinkles: A fun colorful touch that makes the cones feel festive and cheerful.
- Caramel Sauce: Perfect for drizzling on top to add a luscious sweetness and a sticky finish.
How to Make Reese’s Campfire Cones Recipe
Step 1: Gather and Prepare
Start by collecting all your ingredients, making sure to have everything close at hand. This keeps your assembly smooth and mess-free. Having your toppings prepped, like chopped nuts or crushed cookies, and ready to sprinkle will make the entire process flow effortlessly.
Step 2: Fill the Waffle Cones
Layering is key! Begin by placing a few mini Reese’s Peanut Butter Cups at the bottom of each cone to create a scrumptious chocolate and peanut butter foundation. Then add mini marshmallows and sprinkle in chocolate chips, filling the cone about three-quarters full—just enough so it’s packed with gooey goodness, but not so tight that the treats can’t melt together beautifully.
Step 3: Wrap and Heat
Wrap the filled cones tightly in aluminum foil—this step prevents any spillage while keeping warmth inside. You can heat them by holding over a campfire, placing on a grill, or simply baking in a preheated oven at 350°F (175°C) for 5 to 7 minutes. The heat melts the marshmallows and chocolate just right, creating a luscious, melty treat inside the cone.
Step 4: Unwrap and Garnish
Carefully unwrap each cone once heated—it will be hot and gooey. Now’s the time to sprinkle with your favorite toppings such as chopped nuts, crushed cookies, or colorful sprinkles for added texture and fun. A drizzle of caramel sauce really elevates the flavors with an indulgent sweetness. Serve warm and dive into that delicious, melty goodness!
How to Serve Reese’s Campfire Cones Recipe

Garnishes
While the cones are fantastic on their own, a thoughtfully chosen garnish can take your Reese’s Campfire Cones Recipe to the next level. Chopped nuts like walnuts or peanuts add a lovely crunch that contrasts beautifully with the soft marshmallows. Sprinkles bring a festive vibe, especially if you’re serving this at a party or gathering. A drizzle of caramel or even a sprinkle of sea salt can add surprise flavor layers your guests will love.
Side Dishes
For a true camping-inspired feast, serve these cones alongside fresh fruit like sliced apples or bananas, which balance the sweetness. You might also offer a scoop of vanilla or peanut butter ice cream for those who want an extra chilly contrast. A warm cup of hot chocolate or coffee pairs beautifully as well, making it a cozy dessert experience.
Creative Ways to Present
Presentation can be half the fun with this Reese’s Campfire Cones Recipe. Try placing each cone in a sturdy glass jar or wrapping the base with festive paper cones for easier handling. If making for a crowd, serve them in an upright holder or basket lined with parchment paper. You can even set up a toppings bar so everyone can garnish their own cones with their favorites for a hands-on dessert experience.
Make Ahead and Storage
Storing Leftovers
If you’re lucky enough to have leftovers, store the cooled cones in an airtight container at room temperature for up to a day. Because the marshmallows can harden and the cones might soften, they’re best enjoyed fresh, but refrigeration can help preserve them a little longer if necessary.
Freezing
Freezing these cones isn’t the best option as the waffle cones tend to lose their crispness and the melted marshmallows change texture. If you want to preserve the components, consider freezing the mini Reese’s cups and marshmallows separately for future use instead.
Reheating
To reheat, gently warm the cones wrapped in foil in a 300°F oven for a few minutes until warm and melty again. Avoid microwaving as it can cause the cones to become soggy or the chocolate to burn. Reheating over a grill or campfire is a fantastic way to revive that perfect toasted texture.
FAQs
Can I use other types of candy instead of Reese’s Peanut Butter Cups?
Absolutely! While mini Reese’s add that wonderful peanut butter and chocolate combo, you can experiment with other candies like regular chocolate chips, peanut M&Ms, or even caramel-filled chocolates for different flavor twists.
Are there any gluten-free options for this recipe?
Yes! Simply use gluten-free waffle cones and ensure any additional toppings like cookies or sprinkles are gluten-free as well. This way, you can enjoy the Reese’s Campfire Cones Recipe without worry.
Can I make this recipe indoors without a campfire?
Definitely! Baking the cones in a preheated oven at 350°F (175°C) for 5 to 7 minutes works wonderfully and melts everything to perfection, giving you that campfire treat anytime you want.
How important is it to not pack the cones too tightly?
Packing the cones too tightly can cause the filling not to melt evenly and may result in spillage when wrapped and heated. Leaving some space allows the ingredients to melt into each other beautifully and keeps the cones intact.
What are some other creative toppings I can try?
Beyond nuts and cookies, try shredded coconut, mini pretzels for saltiness, crushed candy canes for a minty twist, or even a sprinkle of cinnamon to add warmth and depth. The possibilities are endless and fun to explore!
Final Thoughts
This Reese’s Campfire Cones Recipe is such a delightful, nostalgic treat that’s incredibly easy to make and sure to bring smiles around the fire or at home. Whether you’re seeking a simple dessert for summer evenings or a fun activity with friends and family, these cones deliver gooey, melty happiness in every bite. Give them a try—you’ll soon see why they’ve become a beloved favorite in my kitchen and hopefully in yours too!
Print
Reese’s Campfire Cones Recipe
- Prep Time: 5 minutes
- Cook Time: 7 minutes
- Total Time: 12 minutes
- Yield: 6 to 8 cones
- Category: Dessert
- Method: Baking
- Cuisine: American
Description
Reese’s Campfire Cones are a delightful, easy-to-make treat perfect for camping or anytime you want a warm, gooey dessert. Filled with Reese’s Peanut Butter Cups, mini marshmallows, and chocolate chips, these cones are wrapped in foil and heated until melted, then topped with your favorite crunchy or sweet toppings. They offer a fun twist on s’mores with a rich peanut butter flavor.
Ingredients
Base Ingredients
- 6 to 8 Waffle Cones
- 12 to 16 Mini Reese’s Peanut Butter Cups
- 1 cup Mini Marshmallows
- 1/2 cup Chocolate Chips
Optional Toppings
- Chopped Nuts (e.g., peanuts or walnuts)
- Crushed Cookies
- Sprinkles
- Caramel Sauce (for drizzling)
Instructions
- Prepare Ingredients: Gather waffle cones, mini Reese’s peanut butter cups, mini marshmallows, chocolate chips, and any optional toppings. Having everything ready makes assembly smooth and quick.
- Fill the Cones: Begin by placing a few mini Reese’s peanut butter cups at the bottom of each cone to form a chocolate and peanut butter base. Layer in mini marshmallows and chocolate chips until the cone is about three-quarters full, without packing too tightly.
- Wrap and Heat: Wrap each filled cone tightly in aluminum foil to prevent spillage. Heat over a campfire, grill, or in a preheated oven at 350°F (175°C) for 5 to 7 minutes, until marshmallows and chocolate melt perfectly.
- Serve: Carefully remove cones from heat and unwrap. Sprinkle with optional toppings like chopped nuts, crushed cookies, or drizzle with caramel sauce if desired. Serve warm and enjoy the gooey, chocolatey peanut butter treat!
Notes
- To ensure even melting, do not overfill the cones or pack ingredients too tightly.
- Use aluminum foil tightly wrapped to avoid leaks and mess during heating.
- Feel free to customize toppings to match your taste preferences.
- These cones can be warmed in an oven, over a campfire, or on a grill, making them versatile for indoor or outdoor treats.


