
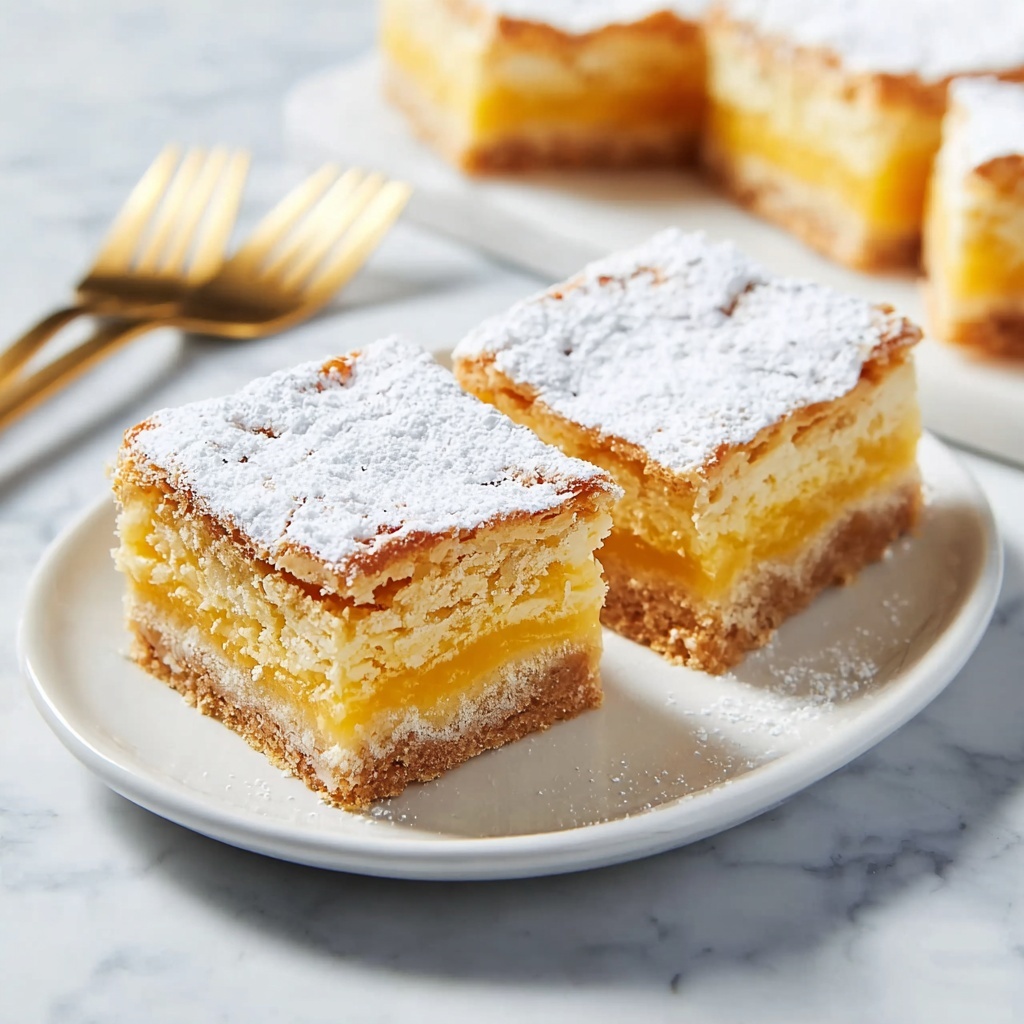
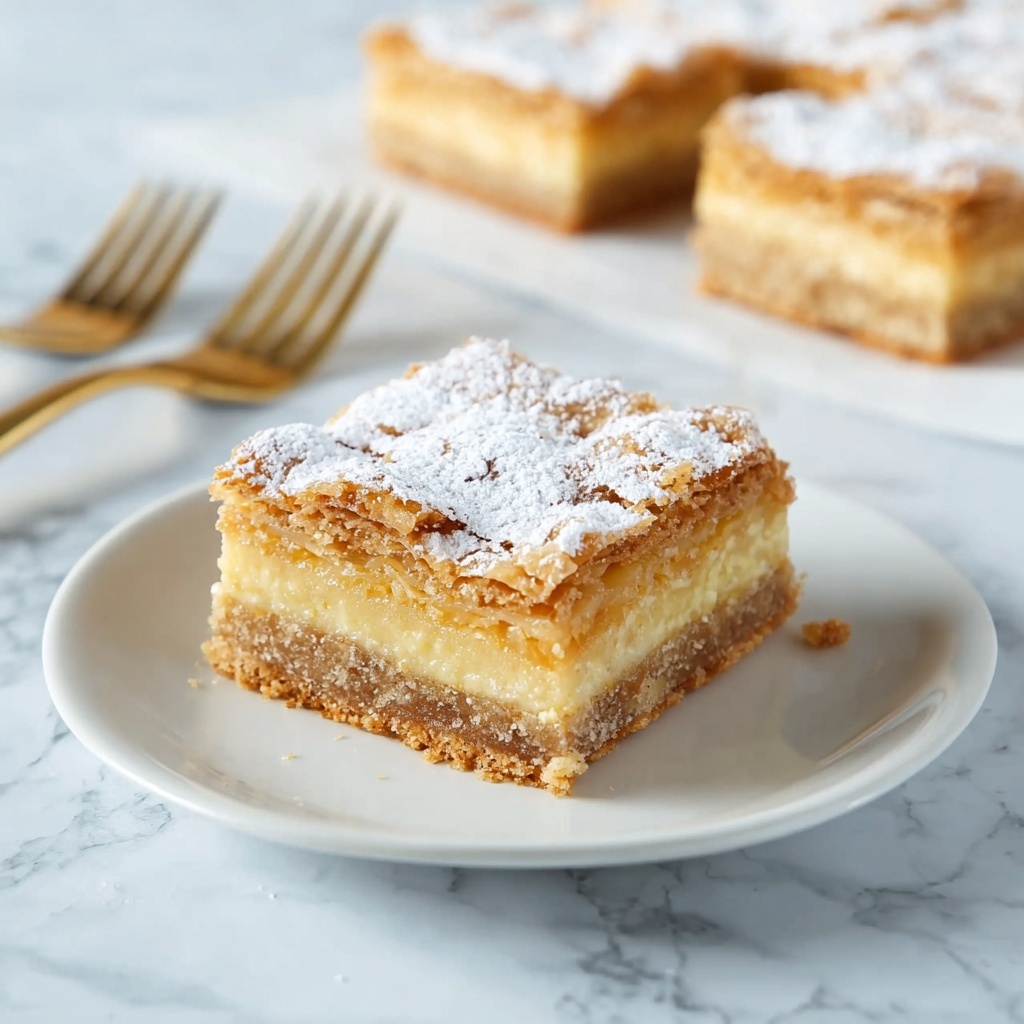
If you are looking for a dessert that delivers a perfect balance of rich, creamy texture and buttery sweetness, then this Gooey Cream Cheese Bars Recipe is destined to become your new go-to treat. Imagine tender, buttery cake layers hugging a luscious cream cheese filling that oozes with every bite. It’s irresistibly soft, melts in your mouth, and is guaranteed to make any gathering extra special. Whether you’re bringing them to a party or just craving a cozy homemade delight, these bars blend simple ingredients into a truly indulgent experience.
Ingredients You’ll Need
Gathering a handful of pantry staples, this recipe is delightfully straightforward. Each ingredient plays its own vital role—from the yellow cake mix providing the perfect tender base, to the cream cheese filling that injects that signature gooey creaminess.
- Yellow cake mix: The foundation of this bar, ensuring a moist and fluffy crumb every time.
- Eggs: Helping bind the cake mix into a rich, tender dough.
- Butter, softened: Adds a buttery depth and juicy richness to the base layer.
- Confectioner’s sugar: Sweetens and smooths the cream cheese filling for that velvety texture.
- Cream cheese, softened: The star that makes this dessert irresistibly gooey and creamy.
- Vanilla extract: A splash of warmth and aromatic sweetness enhancing every bite.
How to Make Gooey Cream Cheese Bars Recipe
Step 1: Prepare the Oven and Base
First things first, preheat your oven to 350 degrees Fahrenheit to ensure it’s ready when your bars are assembled. Then, in a mixing bowl, combine the yellow cake mix with eggs and softened butter. Mixing these creates a moist and buttery base that will bake into a tender crust, setting the stage for the creamy filling.
Step 2: Press the Base into the Pan
Grease your 9×13 inch baking pan well. This step is crucial to prevent sticking. Firmly press your cake mixture evenly across the pan’s bottom; creating a solid foundation will keep each bar intact after baking.
Step 3: Make the Cream Cheese Filling
In another bowl, blend the softened cream cheese with confectioner’s sugar and vanilla extract until smooth and creamy. This mixture is what delivers that signature gooey texture and luscious flavor—so take your time to make it silky smooth.
Step 4: Spread the Cream Cheese Mixture
Gently spread the cream cheese filling over the pressed cake base, making sure it covers the entire surface. This even layering ensures every bar has the right balance of cake and creamy filling.
Step 5: Bake to Gooey Perfection
Bake the assembled pan for about 35 minutes. The bars will set beautifully while still keeping that soft, gooey center we all adore in this Gooey Cream Cheese Bars Recipe.
Step 6: Cool and Cut
Allow the bars to cool completely before slicing. Patience here pays off because the cooling step lets the bars firm up, making them easier to cut into perfect squares ready to be enjoyed.
How to Serve Gooey Cream Cheese Bars Recipe
Garnishes
While these bars are showstoppers on their own, garnishing with a dusting of powdered sugar or a sprinkle of fresh berries can add a lovely touch of color and a hint of fresh tartness that balances the sweetness beautifully.
Side Dishes
Pair these bars with a scoop of vanilla ice cream or a dollop of lightly whipped cream to turn them into a full-fledged dessert experience. For gatherings, a cup of rich coffee or a glass of cold milk complements the creamy and sweet flavor perfectly.
Creative Ways to Present
For a festive occasion, serve the bars on a decorative platter with edible flowers or drizzle with a simple berry coulis. Individual servings in small jars with layers of crumbled bars and fruit make for a charming presentation that’ll wow your friends.
Make Ahead and Storage
Storing Leftovers
Store any leftover bars in an airtight container at room temperature for up to two days or refrigerate for up to a week. Keeping them sealed helps maintain their moist texture and that delightful gooeyness.
Freezing
These bars freeze beautifully. Wrap each bar tightly in plastic wrap and store them in a freezer-safe bag or container. Freeze for up to two months for best flavor and texture. Thaw overnight in the fridge before serving.
Reheating
If you prefer your bars warm, reheat them gently in the microwave for 10 to 15 seconds or until just warm to the touch. This brings back that gooey cream cheese glow without drying them out.
FAQs
Can I use a different cake mix instead of yellow?
Absolutely! While yellow cake mix offers a classic flavor that pairs beautifully with cream cheese, you can experiment with white or even spice cake mixes for a different twist on this delicious bar.
Do I need to use softened cream cheese and butter?
Yes, softening these ingredients makes blending easier and ensures the cream cheese filling is perfectly smooth and creamy without lumps.
Can these bars be made gluten-free?
Yes, substitute the yellow cake mix with a gluten-free alternative. Just make sure it’s a mix formulated for one-to-one substitution to achieve the best texture.
What’s the best way to cut the bars cleanly?
Use a sharp knife warmed under hot water and wiped dry before slicing. This helps make smooth cuts and keeps the gooey filling intact.
How long will these bars stay fresh?
When stored properly in an airtight container in the refrigerator, these bars stay fresh and delicious for up to a week.
Final Thoughts
There’s truly something magical about the way simple ingredients come together in this Gooey Cream Cheese Bars Recipe to create a dessert that feels decadent but is surprisingly easy to make. Once you try these bars, they’ll quickly earn a permanent spot in your recipe collection. So grab your mixing bowl, preheat that oven, and get ready to share some smiles with every luscious bite!
Print
Gooey Cream Cheese Bars Recipe
- Prep Time: 10 minutes
- Cook Time: 35 minutes
- Total Time: 45 minutes
- Yield: 24 servings
- Category: Dessert
- Method: Baking
- Cuisine: American
Description
These Gooey Cream Cheese Bars are a delightful treat featuring a moist yellow cake base topped with a rich and creamy sweetened cream cheese layer. Perfectly baked to gooey perfection, they make an irresistible dessert for any occasion.
Ingredients
Base
- 1 box yellow cake mix
- 2 eggs
- 1/2 cup butter, softened
Cream Cheese Topping
- 4 cups confectioner’s sugar
- 8 oz cream cheese, softened
- 1 teaspoon vanilla extract
Instructions
- Preheat Oven: Preheat your oven to 350 degrees Fahrenheit to prepare for baking the bars.
- Prepare Cake Mixture: In a bowl, combine the yellow cake mix, eggs, and softened butter. Mix thoroughly until well combined to create the cake base.
- Form Cake Base: Press the cake mixture evenly into a greased 9×13 inch baking pan to form the bottom layer.
- Mix Cream Cheese Layer: In another bowl, blend the confectioner’s sugar, softened cream cheese, and vanilla extract until the mixture is creamy and smooth.
- Assemble Bars: Spread the cream cheese mixture evenly over the prepared cake base in the pan.
- Bake: Bake the assembled pan in the preheated oven for 35 minutes, allowing the layers to set and become gooey.
- Cool and Serve: Remove from the oven and allow the bars to cool completely before cutting into squares for serving.
Notes
- Make sure the cream cheese and butter are softened to room temperature to ensure smooth mixing.
- Press the cake mixture firmly into the pan to create an even base.
- Allow the bars to cool completely to prevent the cream cheese layer from becoming too soft when cutting.
- For a different flavor twist, consider adding lemon zest to the cream cheese mixture.
- Store leftovers in an airtight container in the refrigerator for up to 4 days.


