
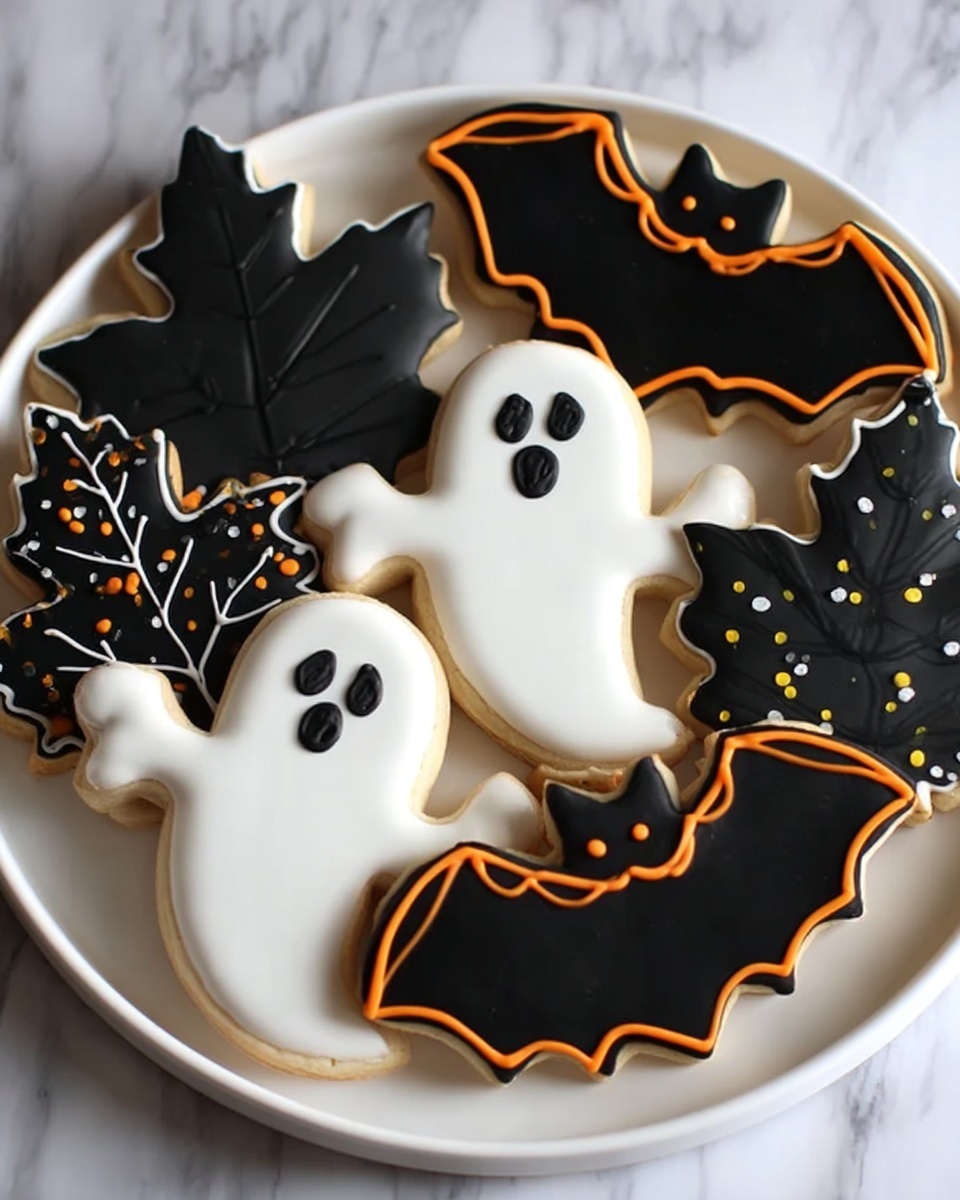
If you’re looking to bring some festive fun and delicious charm to your Halloween celebrations, this Halloween Royal Icing Cookies Recipe is an absolute must-try. These cookies aren’t just adorable with their spooky themes and vibrant colors; they’re soft, buttery, and topped with beautifully smooth royal icing that hardens to perfection. Perfect for sharing with friends, decorating with kids, or gifting to neighbors, these cookies capture the spirit of Halloween in every bite and every detail.

Ingredients You’ll Need
The magic behind this Halloween Royal Icing Cookies Recipe lies in its simple yet essential ingredients. Each one plays a crucial role—creating a tender cookie base that’s the perfect canvas for your icing masterpiece and delivering rich, delightful flavors that everyone loves.
- 1 cup (226 g) unsalted butter (chilled): Gives the cookies a rich, buttery flavor and tender crumb.
- 1 cup (200 g) granulated sugar: Adds sweetness and helps achieve a light, fluffy cookie dough.
- 1 whole egg: Binds ingredients together and adds moisture.
- 1 egg yolk: Contributes to a richer texture and deeper color.
- 2 tsp vanilla extract: Adds warm, inviting flavor throughout the cookies.
- 1 tsp salt: Balances sweetness and enhances all the other flavors.
- 3 cups + 2 tbsp (375 g) all-purpose flour: Provides structure to the dough for perfect shape and texture.
- 4 egg whites: Backbone of the royal icing, creating that shiny, hard-drying finish.
- 2 lbs powdered sugar: Sweetens and thickens the royal icing to perfection.
- 1 tsp vanilla extract: Adds flavor to the royal icing.
- ½ tsp butter emulsion (or butter flavoring): Gives the icing a subtle buttery richness.
- ¼ tsp almond emulsion (or almond extract): Provides a delicate, nutty nuance in the icing.
- Water (as needed): Adjusts the consistency of the royal icing for piping and flooding.
- Gel food coloring (orange and black): Gives your cookies their iconic Halloween colors.
- Halloween candy skulls (for coffin cookies): Fun edible decorations to make your cookies extra spooky.
- Sprinkles (for cauldron cookies): Adds crunch and visual interest.
How to Make Halloween Royal Icing Cookies Recipe
Step 1: Make the Cookie Dough
Start by creaming the chilled butter and granulated sugar together until the mixture becomes light and fluffy—that fluffy texture sets the stage for tender cookies. Then, beat in the whole egg, egg yolk, vanilla extract, and salt. The combination of whole egg and yolk contributes richness and moisture, creating that soft mouthfeel you want. Gradually mix in the flour, just until everything comes together into a smooth dough. Be careful not to overmix—this keeps your cookies delightfully tender rather than tough.
Step 2: Chill the Dough
Pop your dough into the refrigerator for at least an hour. This chilling step is crucial—it helps the dough firm up, making it easier to roll out and cut into precise Halloween shapes that hold their form beautifully during baking. Plus, it prevents spreading so your spooky cutouts look sharp and defined.
Step 3: Cut and Bake
Roll out your chilled dough on a lightly floured surface to about 1/4 inch thickness. Grab your favorite Halloween-themed cutters—ghosts, coffins, pumpkins, witches’ hats—and cut out your shapes. Transfer them to baking sheets lined with parchment paper or silicone mats. Bake at 350°F (175°C) for around 11 minutes, watching carefully to avoid browning so the cookies stay soft and perfect for decorating.
Step 4: Cool the Cookies
Once baked, transfer the cookies to a wire rack to cool completely. This step is non-negotiable because applying royal icing on warm cookies can cause the icing to melt or run, ruining the finish. Patience pays off with the perfect decorating canvas.
Step 5: Prepare the Royal Icing
Beat the egg whites until frothy and then gradually incorporate the powdered sugar, mixing until you have a glossy, smooth icing. Stir in vanilla extract, butter emulsion, and almond emulsion for complexity in flavor. Add water slowly to reach your desired consistency—thicker icing is great for detailed piping outlines, while a thinner flood consistency fills areas smoothly.
Step 6: Color the Icing and Decorate
Divide your royal icing into separate bowls—keep some white, then color portions with orange and black gel food coloring. Using piping bags fitted with fine tips, outline and flood your cookies, switching colors as your design calls for that classic Halloween look. Add candy skulls on coffin-shaped cookies and sprinkle your cauldron shapes for a dramatic finishing touch.
Step 7: Dry the Icing
Allow your masterpiece cookies to dry completely in a cool, drafty spot or in front of a fan or small heater. This drying time lets the icing harden to a shiny, smooth finish that resists smudging or sticking, so your cookies look fabulous for days.
How to Serve Halloween Royal Icing Cookies Recipe
Garnishes
Sprinkle a few extra Halloween-themed candies like candy skulls, mini chocolate chips, or edible glitter right before serving to add eye-catching sparkle and texture. Fresh mint leaves or tiny edible flowers can add an unexpected burst of color contrast that pairs beautifully with the bright icing.
Side Dishes
Pair your Halloween Royal Icing Cookies Recipe with a warm cup of spiced apple cider or a rich dark hot chocolate. These classic autumnal drinks complement the sweet, buttery flavors of the cookies and make the whole experience feel extra cozy and festive.
Creative Ways to Present
Arrange your decorated cookies on a Halloween-themed platter lined with black lace parchment or twisted orange and black ribbon. For parties, consider stacking them in decorative tins or cello bags tied with themed ribbons, making delightful gifts or party favors everyone will remember.
Make Ahead and Storage
Storing Leftovers
Store leftover cookies in an airtight container at room temperature for up to 5 days. Keep parchment sheets between layers to prevent sticking and preserve the icing’s perfection. This allows you to prepare in advance and enjoy the festive treats beyond the party day.
Freezing
You can freeze un-iced cookie dough or completely decorated cookies. For dough, wrap tightly and freeze for up to 3 months—thaw overnight before rolling and baking. For decorated cookies, freeze in a single layer in an airtight container to prevent damage to the icing. Thaw at room temperature and avoid moisture.
Reheating
Since these cookies are best enjoyed soft and fresh, reheating isn’t usually necessary. If you prefer warm cookies, gently warm them in a low oven (about 300°F/150°C) for 3–4 minutes but avoid softening the royal icing by keeping the temperature low and time short.
FAQs
Can I use pasteurized egg whites for the royal icing?
Absolutely! Using pasteurized egg whites is a safe and convenient way to prepare royal icing, especially if you are concerned about raw eggs. Just use the same quantity, and you’ll achieve that perfect shine and hard-drying effect.
How long does royal icing take to dry completely?
Royal icing usually takes around 4 to 6 hours to dry thoroughly at room temperature. For a sturdier finish, overnight drying works best and keeps the icing glossy and firm.
Can I make these cookies gluten-free?
You can substitute the all-purpose flour with a gluten-free flour blend suitable for baking. Just make sure it includes xanthan gum or add a little extra to help with structure. Texture may vary slightly, but the cookies will still be delicious!
What if I don’t have butter emulsion or almond extract?
If you don’t have either flavoring, simply omit it from the royal icing—the vanilla extract still provides plenty of flavor. However, including them amps up the complexity and adds a lovely, subtle richness.
How do I prevent the cookies from spreading too much while baking?
Chilling the dough before cutting and baking is key. Also, avoid over-creaming the butter and sugar, as this can introduce excess air that causes spreading. Baking at the recommended temperature helps the cookies set quickly and hold their shape.
Final Thoughts
Baking these Halloween Royal Icing Cookies Recipe is not only a delightful way to celebrate the season but also a wonderful creative outlet that yields deliciously festive treats everyone will adore. Whether you’re decorating with the kids or preparing a spooky dessert platter for your party, these cookies bring joy, flavor, and a bit of holiday magic. So grab your aprons, preheat that oven, and dive into the fun of making Halloween memories one decorated cookie at a time!
Print
Halloween Royal Icing Cookies Recipe
- Prep Time: 1 hour 20 minutes
- Cook Time: 11 minutes
- Total Time: 1 hour 31 minutes
- Yield: 24 servings
- Category: Dessert
- Method: Baking
- Cuisine: American
Description
Celebrate Halloween with these festive Halloween Royal Icing Cookies, featuring soft, buttery sugar cookies decorated with vibrant royal icing in spooky orange, black, and white colors. Perfect for parties, these cookies are enhanced with fun candy skulls and sprinkles to bring the Halloween spirit to your table.
Ingredients
For the Cookies:
- 1 cup (226 g) unsalted butter, chilled
- 1 cup (200 g) granulated sugar
- 1 whole egg
- 1 egg yolk
- 2 tsp vanilla extract
- 1 tsp salt
- 3 cups + 2 tbsp (375 g) all-purpose flour
For the Royal Icing:
- 4 egg whites
- 2 lbs powdered sugar
- 1 tsp vanilla extract
- ½ tsp butter emulsion (or butter flavoring)
- ¼ tsp almond emulsion (or almond extract)
- Water, as needed
- Gel food coloring: orange and black
- Halloween candy skulls (for coffin cookies)
- Sprinkles (for cauldron cookies)
Instructions
- Make the Cookie Dough: Cream the chilled butter and granulated sugar together until the mixture is light and fluffy. Beat in the whole egg, egg yolk, vanilla extract, and salt. Gradually incorporate the all-purpose flour until just combined to form the dough.
- Chill the Dough: Place the dough in the refrigerator and chill for at least 60 minutes. This step ensures the cookies will hold their shape during baking.
- Cut and Bake: Roll out the chilled dough on a lightly floured surface to your desired thickness. Use Halloween-themed cookie cutters to cut out shapes. Bake the cookies on a parchment-lined baking sheet at 350°F (175°C) for approximately 11 minutes or until they are set but not browned, which keeps them soft.
- Cool the Cookies: Transfer cookies to a wire rack and allow them to cool completely before decorating.
- Prepare the Royal Icing: Beat the egg whites until they become frothy. Gradually sift in powdered sugar and mix until smooth. Add vanilla extract, butter emulsion, and almond emulsion. Adjust consistency by adding water a little at a time, until the icing is suitable for piping and flooding.
- Color the Icing: Divide the royal icing into separate bowls. Tint portions with gel food coloring to create orange and black icings, leaving some icing white for contrast.
- Decorate the Cookies: Using piping bags fitted with #1 or #2 tips, outline and fill the cookies with the colored royal icing. While the icing is still wet, apply Halloween candy skulls on coffin-shaped cookies and sprinkles on cauldron-shaped cookies for decorative effect.
- Dry the Icing: Allow the decorated cookies to dry completely by placing them in front of a fan or small heater. This step ensures the icing hardens with a shiny finish.
Notes
- Chilling the dough is crucial to prevent spreading during baking and to keep cookie shapes defined.
- Use gel food coloring for vibrant colors without affecting icing consistency.
- Adjust royal icing consistency: thicker for outlining, thinner for flooding the cookie surface.
- Drying time for royal icing can vary; using a fan or small heater helps speed up the process.
- Store decorated cookies in an airtight container at room temperature to preserve freshness.

