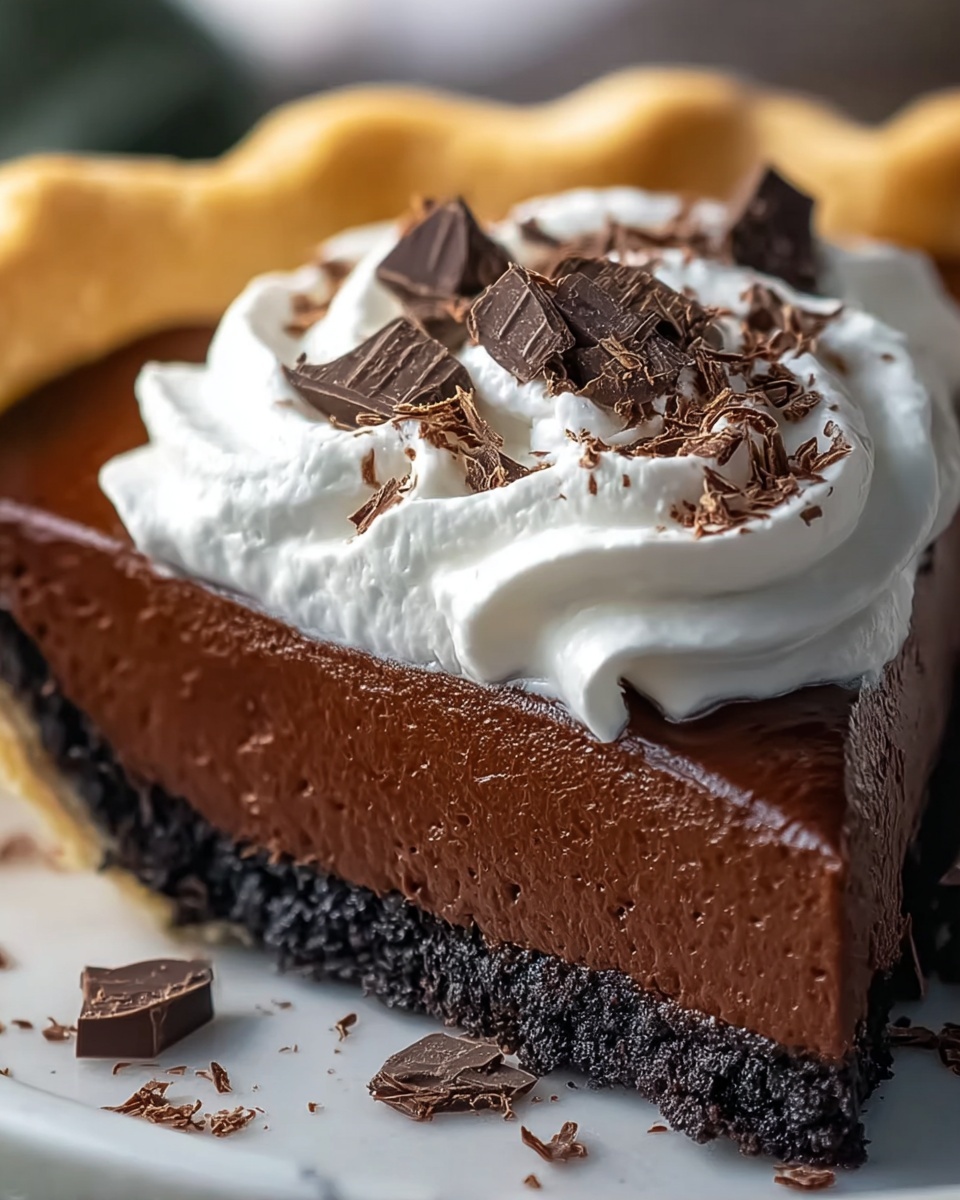
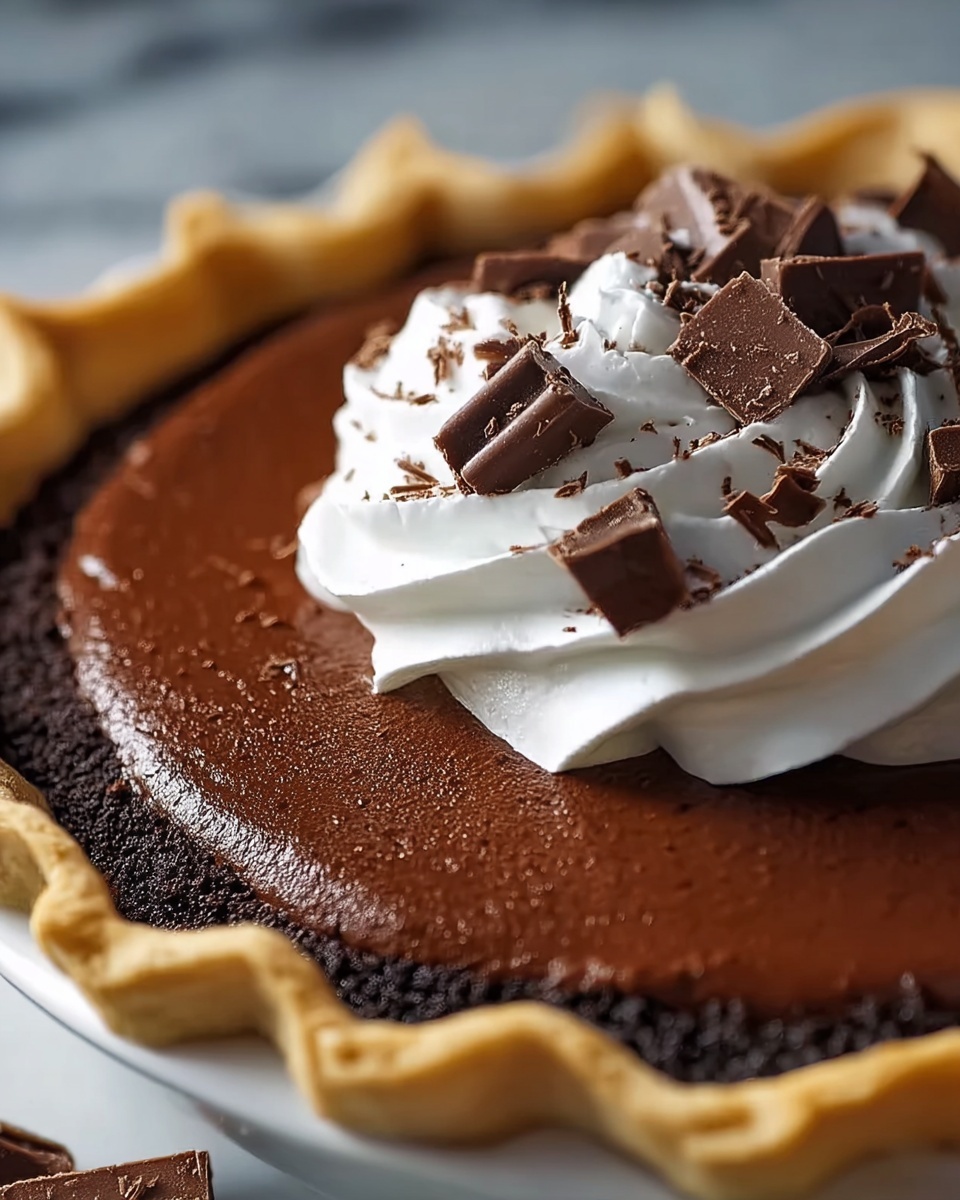
If you have a soft spot for nostalgic desserts that bring back warm memories and satisfy chocolate cravings all at once, this Old-Fashioned Chocolate Pudding Pie Recipe is your new best friend in the kitchen. Rich, creamy, and delightfully smooth, this pie combines a tender, flaky crust with luscious homemade chocolate pudding and a cloud of whipped cream. It’s the kind of dessert that feels like a comforting hug and tastes like a celebration in every bite, perfect for sharing with family or impressing your guests with homemade charm.
Ingredients You’ll Need
This recipe calls for straightforward, classic ingredients that come together beautifully to build the perfect flavor and texture profile. Each component plays its part, from the creamy milk that gives the pudding its silky consistency to the cocoa powder that delivers that beloved deep chocolate punch.
- 1 (9-inch) pie crust: Choose store-bought for convenience or homemade for extra love and flakiness.
- 2 1/2 cups whole milk: Provides the creamy base for the pudding, richer than low-fat versions.
- 1/2 cup granulated sugar: Sweetens the pudding just right while balancing the cocoa’s bitterness.
- 1/3 cup unsweetened cocoa powder: The star ingredient for that deep chocolate flavor.
- 1/4 teaspoon salt: Enhances and sharpens all the sweet and chocolate notes.
- 3 large egg yolks, beaten: Gives the pudding richness and helps it thicken beautifully.
- 2 tablespoons unsalted butter: Adds a glossy finish and smooth mouthfeel.
- 1 teaspoon pure vanilla extract: Brightens up the chocolate with a warm aroma.
- 2 tablespoons cornstarch: The thickening magic behind the luscious pudding texture.
- 1 cup heavy whipping cream: Whipped to light peaks for a luscious topping.
- 2 tablespoons powdered sugar: Sweetens the whipped cream gently without graininess.
- 1 teaspoon vanilla extract: Blends into the whipped cream for extra flavor depth.
How to Make Old-Fashioned Chocolate Pudding Pie Recipe
Step 1: Prepare the Pie Crust
If you’re using a store-bought crust, follow the package instructions for blind-baking, which usually take about 10 to 12 minutes. For homemade crust, roll it out to fit your 9-inch pie pan and bake it until golden and crisp. Let your crust cool completely before adding the pudding filling to ensure a perfectly flaky texture without sogginess.
Step 2: Mix Dry Ingredients
In a medium saucepan, whisk together the sugar, cocoa powder, salt, and cornstarch until evenly combined. This dry mixture is the foundation that will thicken into the velvety chocolate pudding we’re aiming for.
Step 3: Warm the Milk
Gradually pour the whole milk into the dry mix while whisking continuously. Heat it over medium, stirring often, until the mixture is warm but not boiling. This gradual warming helps the cocoa bloom and the starch activate smoothly, preventing lumps.
Step 4: Temper the Egg Yolks
Slowly whisk a small amount of the hot chocolate mixture into the beaten egg yolks to gently raise their temperature without scrambling them. Then pour the yolk mixture back into the saucepan. Whisk constantly as the pudding thickens and comes to a boil, showing that perfect custard consistency.
Step 5: Cook and Finish the Pudding
Once boiling, reduce the heat to low and keep stirring for an extra 1 to 2 minutes to fully develop the pudding’s silky texture. Remove from heat and whisk in the butter and vanilla extract, which add richness and that unmistakable comforting aroma.
Step 6: Chill the Pudding
Transfer the pudding to a bowl and press plastic wrap directly on the surface to keep a skin from forming. Let it cool for about 10 minutes before placing it in the refrigerator for at least 4 hours to set into a sliceable pie filling.
Step 7: Prepare the Whipped Cream
Beat the heavy whipping cream together with powdered sugar and vanilla extract until soft peaks form. This light, fluffy layer is the perfect counterpart to the dense chocolate base.
Step 8: Assemble and Serve
Spread the whipped cream evenly over the chilled pudding layer within your pie crust. Smooth it out or pipe it creatively to make the presentation as inviting as the flavor.
How to Serve Old-Fashioned Chocolate Pudding Pie Recipe

Garnishes
A simple dusting of cocoa powder, a sprinkle of chocolate shavings, or a few fresh raspberries take this pie from classic to unforgettable. Each garnish adds a pop of color or an extra flavor note that pairs beautifully with creamy chocolate.
Side Dishes
Serve alongside a scoop of vanilla ice cream or a small cup of freshly brewed coffee to balance the richness. Fresh fruit or a crisp green salad also works well as a refreshing contrast after a decadent slice.
Creative Ways to Present
Try this pie in mini tart pans for individual servings, or layer the pudding and whipped cream in clear glasses for an elegant parfait-style dessert. Garnishing with edible flowers or a drizzle of caramel adds a delightful finishing touch that will wow your guests.
Make Ahead and Storage
Storing Leftovers
Leftover Old-Fashioned Chocolate Pudding Pie Recipe should be covered tightly with plastic wrap or placed in an airtight container and refrigerated. It holds beautifully for 3 to 4 days, maintaining that luscious, creamy texture without drying out.
Freezing
This pie is best enjoyed fresh or refrigerated, but you can freeze the pudding layer separately before assembling. Wrap it well to prevent freezer burn and thaw in the fridge overnight before adding whipped cream and pie crust.
Reheating
Since the pie is custard-based and served chilled, reheating is not recommended. Instead, serve directly from the fridge for the perfect creamy and cool experience that this Old-Fashioned Chocolate Pudding Pie Recipe delivers.
FAQs
Can I use a different type of milk?
Whole milk is preferred for its creaminess, but you can substitute 2% milk if needed, though the pudding might be slightly less rich. Avoid skim milk, as it won’t provide the same smooth texture.
Do I have to blind-bake the crust?
Yes, blind-baking ensures the crust stays flaky and crisp instead of becoming soggy once the pudding filling is added. It’s a small step that makes a big difference in texture.
Can I make this pie vegan?
This traditional recipe relies on dairy and eggs for texture and flavor, but you can experiment with plant-based milks, vegan butter, and egg substitutes. Just be aware the texture may vary.
How long does the pie last once assembled?
When stored properly in the refrigerator, this pie stays delicious for up to 4 days. The whipped cream topping is best on the day it’s made but still tastes good the next day.
Can I add chocolate chips to the pudding?
While not traditional in this Old-Fashioned Chocolate Pudding Pie Recipe, folding in mini chocolate chips after cooking the pudding adds delightful bursts of melted chocolate in each bite.
Final Thoughts
There’s something undeniably charming about an Old-Fashioned Chocolate Pudding Pie Recipe that brings simplicity and indulgence together in the best possible way. Whether you’re baking for family, friends, or just yourself, this pie is a guaranteed crowd-pleaser that feels like a warm hug on any occasion. I truly hope you give it a try and see why it’s one of my all-time favorite desserts to share and savor.
Print
Old-Fashioned Chocolate Pudding Pie Recipe
- Prep Time: 15 minutes
- Cook Time: 20 minutes
- Total Time: 4 hours 35 minutes
- Yield: 8 to 10 servings
- Category: Dessert
- Method: Stovetop
- Cuisine: American
Description
This Old-Fashioned Chocolate Pudding Pie is a classic dessert featuring a rich and creamy homemade chocolate pudding filling nestled in a flaky pie crust and topped with a luscious whipped cream layer. Perfect for chocolate lovers, this pie combines the nostalgia of traditional pudding pie with a smooth, velvety texture and a hint of vanilla, making it an irresistible treat for any occasion.
Ingredients
Pie Crust
- 1 (9-inch) pie crust (store-bought or homemade)
Pudding Filling
- 2 1/2 cups whole milk
- 1/2 cup granulated sugar
- 1/3 cup unsweetened cocoa powder
- 1/4 teaspoon salt
- 3 large egg yolks, beaten
- 2 tablespoons unsalted butter
- 1 teaspoon pure vanilla extract
- 2 tablespoons cornstarch
Whipped Cream Topping
- 1 cup heavy whipping cream
- 2 tablespoons powdered sugar
- 1 teaspoon vanilla extract
Instructions
- Prepare the Pie Crust: If using a store-bought pie crust, preheat your oven and follow the package instructions for blind baking, typically 10-12 minutes. For a homemade crust, roll it out and fit it into a 9-inch pie pan, then bake at 350°F (175°C) for 10-12 minutes or until golden brown. Allow the crust to cool completely before filling.
- Mix Dry Ingredients for Pudding: In a medium saucepan, whisk together the granulated sugar, unsweetened cocoa powder, cornstarch, and salt until well combined to ensure a smooth pudding without lumps.
- Heat Milk: Slowly whisk in the whole milk to the dry ingredients and place the saucepan over medium heat. Cook, stirring frequently, until the mixture is hot but not boiling, allowing it to start thickening.
- Temper and Add Egg Yolks: Gradually whisk in the beaten egg yolks into the hot chocolate mixture to prevent curdling. Continue to cook over medium heat, whisking constantly until the pudding thickens and begins to boil.
- Cook Further to Thicken: Once boiling, reduce the heat to low and cook for an additional 1-2 minutes while whisking to ensure smoothness and full thickening of the pudding.
- Add Butter and Vanilla: Remove the saucepan from heat and whisk in the unsalted butter and pure vanilla extract until fully melted and incorporated into the pudding.
- Cool Pudding: Transfer the chocolate pudding to a bowl and cover the surface directly with plastic wrap to prevent a skin from forming. Let it cool at room temperature for about 10 minutes.
- Chill Pudding: Refrigerate the pudding for at least 4 hours, or until it is completely set and firm enough to slice.
- Prepare Whipped Cream: In a chilled mixing bowl, beat the heavy whipping cream, powdered sugar, and vanilla extract together until soft peaks form, ensuring a light and fluffy topping.
- Assemble Pie: Once the pudding is set and chilled, pour the thick pudding filling into the cooled pie crust, spreading evenly.
- Add Whipped Cream Topping: Evenly spread the prepared whipped cream over the top of the pudding pie, creating a smooth, creamy finish. Serve chilled for best texture and flavor.
Notes
- For a crisper crust, blind bake with pie weights to prevent shrinking.
- Use fresh eggs and whisk constantly to avoid scrambling the yolks when tempering into hot milk.
- Covering pudding with plastic wrap directly on its surface is key to prevent pudding skin formation.
- Chilling time can be extended overnight for firmer texture.
- Optional: Garnish with chocolate shavings or fresh berries before serving for added presentation.


