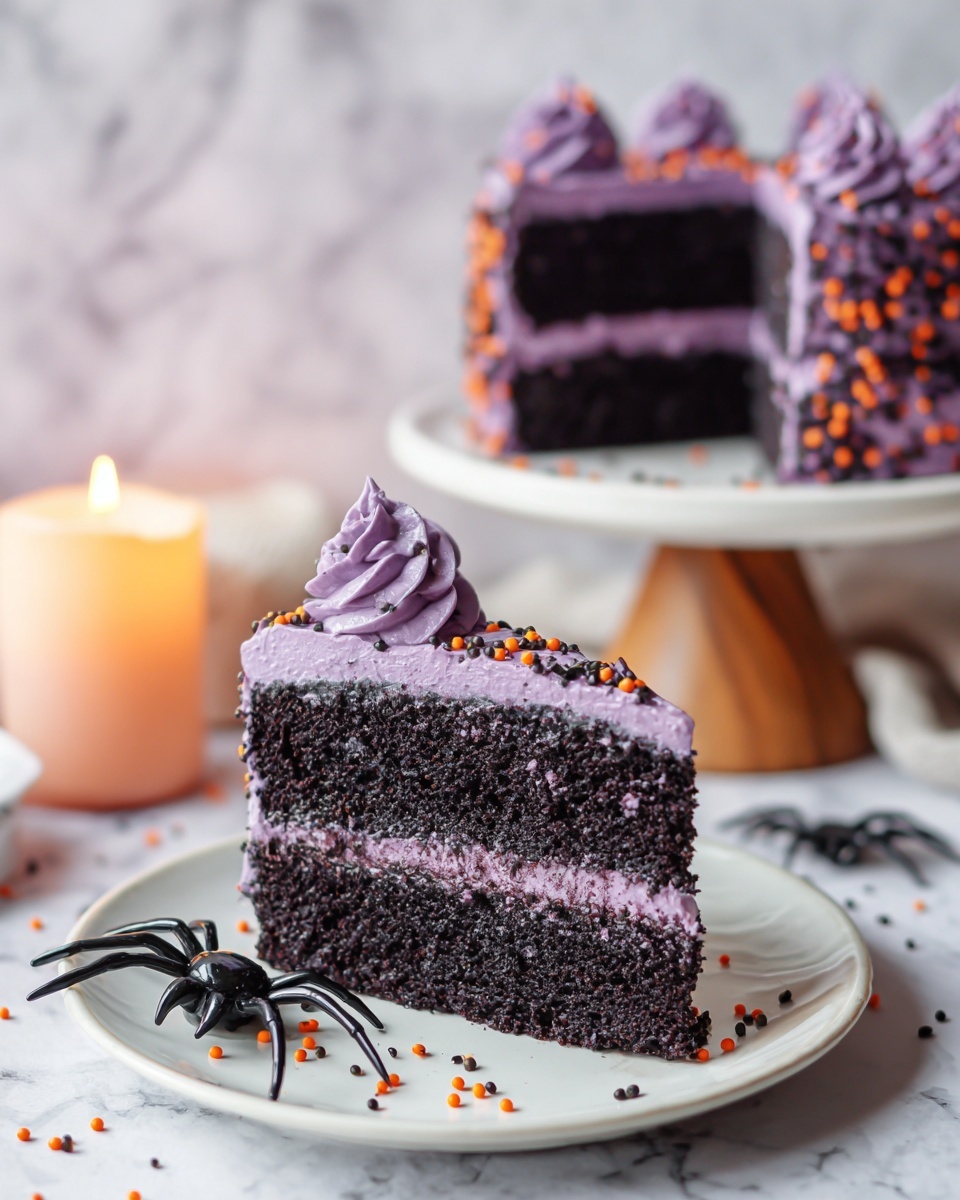
If you’re looking to wow your friends and family this spooky season, the Spooky Black Velvet Halloween Cake Recipe is your ultimate secret weapon. This cake is a showstopper with its deep, rich black velvet crumb that’s as moist as it is decadent, paired with a fluffy, sweet frosting that perfectly balances the intense cocoa flavor. Whether you want to impress at a Halloween party or just treat yourself to something delightfully eerie and delicious, this cake captures the spirit of the holiday while satisfying any chocolate craving. Plus, it’s surprisingly simple to make, so you’ll be enjoying a hauntingly good dessert in no time!
Ingredients You’ll Need
The beauty of the Spooky Black Velvet Halloween Cake Recipe is how straightforward yet impactful the ingredients are. Each one plays an essential role—from the rich cocoa that lends the cake its signature darkness to the buttermilk that keeps it incredibly tender and moist.
- 1 3/4 cups all-purpose flour: The cake’s sturdy foundation that ensures the perfect crumb texture.
- 3/4 cup unsweetened cocoa powder (Dutch-processed): Intensifies the chocolate flavor and gives the cake its dark hue.
- 1 tsp baking powder: Helps the cake rise evenly and stay light.
- 1/2 tsp baking soda: Works alongside the baking powder for a tender crumb.
- 1/2 tsp salt: Balances sweetness and enhances the cocoa’s richness.
- 1 1/4 cups granulated sugar: Provides the perfect amount of sweetness.
- 1 cup buttermilk, room temperature: Adds moisture and a subtle tang to balance the sweetness.
- 1/2 cup vegetable oil: Keeps the cake moist without overpowering flavor.
- 2 large eggs, room temperature: Bind everything together and add structure.
- 2 tsp black food coloring gel: Makes the cake that signature spooky black color.
- 1 tsp vanilla extract: Adds depth to the chocolate notes.
- 1 cup unsalted butter, softened (for frosting): Creates a creamy, rich base for the frosting.
- 4 cups powdered sugar: Sweetens and thickens the frosting perfectly.
- 2 tbsp milk: Helps achieve the ideal frosting consistency.
- 1 tsp vanilla extract (for frosting): Enhances the buttery sweetness.
- Black or orange food coloring (optional): For spooky themed frosting color variations.
- Halloween-themed sprinkles or edible glitter: For that festive finishing touch.
- Plastic spider rings and black or purple candles: Adds playful décor and atmosphere.
How to Make Spooky Black Velvet Halloween Cake Recipe
Step 1: Prep Your Pans and Oven
Begin by preheating your oven to 350°F (175°C). Grease and flour two 8-inch round cake pans or line them with parchment paper for easy removal after baking. This step may seem basic, but it’s crucial to ensure your cakes come out perfectly shaped and won’t stick to the pans.
Step 2: Mix the Dry Ingredients
In a large bowl, whisk together the all-purpose flour, Dutch-processed cocoa powder, baking powder, baking soda, and salt. This ensures that the leavening agents and chocolate are evenly distributed, which contributes to a uniform rise and rich chocolate taste throughout the cake.
Step 3: Whisk the Wet Ingredients
Take a separate bowl and beat together the granulated sugar, buttermilk, vegetable oil, eggs, black food coloring gel, and vanilla extract until everything is smooth and combined. This mixture is what will keep your cake moist and give it that striking black color that truly makes this recipe so special.
Step 4: Combine Dry and Wet Ingredients
Gradually add the dry ingredients to the wet mixture, mixing gently until smooth. Be careful not to overmix, as that could lead to a dense cake. The consistency should be thick but pourable, setting you up for a light, tender crumb.
Step 5: Bake the Cake
Divide the batter evenly between the prepared pans, smoothing the tops. Bake for 30 to 35 minutes, or until a toothpick inserted in the center comes out clean. Watching the baking times closely helps you avoid dryness while ensuring the cake is cooked through perfectly.
Step 6: Cool the Cakes
Allow the cakes to cool in the pans for 10 minutes, then carefully transfer them to a wire rack to cool completely. This cooling step is so important for stacking and frosting the cake without melting the frosting or crumbling the layers.
Step 7: Prepare the Frosting
To make the frosting, beat the softened butter until creamy and light. Gradually add the powdered sugar, milk, and vanilla extract, beating well until fluffy and smooth. If you want to enhance the spooky vibe, tint your frosting with black or orange food coloring at this stage.
Step 8: Assemble and Frost the Cake
Place one cake layer on your serving plate and spread a generous layer of frosting on top. Stack the second layer carefully and cover the entire cake with frosting. This step is your chance to get creative and smooth or texture the frosting to your liking.
Step 9: Decorate with Halloween Flair
Finally, adorn your cake with Halloween-themed sprinkles, edible glitter, or even plastic spider rings for a playful touch. Lighting a few black or purple candles around the cake sets the eerie mood for your celebration.
How to Serve Spooky Black Velvet Halloween Cake Recipe

Garnishes
Adding garnishes like edible glitter or Halloween-themed sprinkles elevates your cake’s presentation and adds a delightful crunch or sparkle that guests will love. The plastic spider rings bring a fun, interactive component—just remind everyone they’re not edible!
Side Dishes
Serve this cake alongside a scoop of vanilla ice cream or a cup of spiced pumpkin latte to amplify the seasonal vibes. Fresh berries or a dollop of whipped cream make excellent accompaniments to cut through the rich chocolate notes nicely.
Creative Ways to Present
For a truly memorable presentation, place the cake on a vintage cake stand surrounded by cobweb decor and flickering candles. You can also add small Halloween figurines or themed cake toppers to create a centerpiece that’s as spooky as it is delicious.
Make Ahead and Storage
Storing Leftovers
Wrap any leftover cake tightly in plastic wrap or store in an airtight container to preserve its moisture. You can safely keep it at room temperature for up to two days or refrigerate it for up to a week.
Freezing
This cake freezes beautifully! Wrap it securely with plastic wrap followed by aluminum foil or place it in a freezer-safe container. When you’re ready, thaw it overnight in the fridge to keep the texture intact and fresh.
Reheating
If you want to enjoy the cake slightly warm, reheat individual slices in the microwave for about 15-20 seconds. This warms up the frosting just right without making it melt, perfect for cozy late-night treats.
FAQs
Can I use regular cocoa powder instead of Dutch-processed?
You can, but Dutch-processed cocoa gives the cake a smoother, less acidic flavor and helps achieve the signature dark color. If you use regular cocoa, expect a slightly different taste and color.
What if I don’t have black food coloring gel?
You can try a combination of blue and green gels to create a darker shade, but black gel works best for that truly spooky black velvet effect.
Is this cake gluten-free?
This recipe calls for all-purpose flour, so it’s not gluten-free. However, you can experiment with gluten-free flour blends designed for baking to make a version that suits your dietary needs.
Can I make cupcakes instead of a cake?
Absolutely! Simply divide the batter into cupcake liners and reduce the baking time to about 18–22 minutes, keeping an eye on them to avoid overbaking.
How far in advance can I make this cake?
You can bake the cake layers up to two days ahead and store them wrapped in the fridge. Assemble and frost right before serving to keep it fresh and moist.
Final Thoughts
There is something truly magical about the Spooky Black Velvet Halloween Cake Recipe that turns any Halloween gathering into an unforgettable event. Its rich flavor, dramatic appearance, and surprisingly easy preparation make it a standout on any dessert table. I can’t wait for you to try it and watch the delighted faces as your spooky creation disappears bite by bite!
Print
Spooky Black Velvet Halloween Cake Recipe
- Prep Time: 15 minutes
- Cook Time: 35 minutes
- Total Time: 55 minutes
- Yield: 10 servings
- Category: Baking
- Method: Baking
- Cuisine: American
- Diet: Vegetarian
Description
This Spooky Black Velvet Halloween Cake is a moist, rich black cocoa dessert perfect for Halloween celebrations. Featuring dark black cake layers tinted with black food coloring, it’s frosted with creamy buttercream and decorated with festive Halloween sprinkles, edible glitter, and fun plastic spider rings for a hauntingly delightful treat.
Ingredients
Cake Ingredients
- 1 3/4 cups all-purpose flour
- 3/4 cup unsweetened cocoa powder (Dutch-processed)
- 1 tsp baking powder
- 1/2 tsp baking soda
- 1/2 tsp salt
- 1 1/4 cups granulated sugar
- 1 cup buttermilk, room temperature
- 1/2 cup vegetable oil
- 2 large eggs, room temperature
- 2 tsp black food coloring gel
- 1 tsp vanilla extract
Frosting Ingredients
- 1 cup unsalted butter, softened
- 4 cups powdered sugar
- 2 tbsp milk
- 1 tsp vanilla extract
- Black or orange food coloring (optional)
Decorations
- Halloween-themed sprinkles or edible glitter
- Plastic spider rings
- Black or purple candles
Instructions
- Preheat and Prepare Pans: Preheat your oven to 350°F (175°C). Grease and flour two 8-inch round cake pans or line them with parchment paper to ensure the cakes release easily after baking.
- Mix Dry Ingredients: In a large bowl, thoroughly whisk together the all-purpose flour, Dutch-processed cocoa powder, baking powder, baking soda, and salt to ensure even distribution of leavening agents and cocoa flavor.
- Combine Wet Ingredients: In a separate bowl, beat together the granulated sugar, buttermilk, vegetable oil, eggs, black food coloring gel, and vanilla extract until the mixture is smooth and well combined, creating a rich, dark batter.
- Incorporate Dry Ingredients: Gradually add the dry ingredient mixture to the wet ingredients, mixing gently but thoroughly until the batter is smooth with no lumps, taking care not to overmix.
- Divide and Bake: Evenly divide the batter between the two prepared cake pans. Place them in the oven and bake for 30-35 minutes or until a toothpick inserted in the center comes out clean, indicating the cakes are fully baked.
- Cool the Cakes: Let the cakes cool in their pans for about 10 minutes to firm up, then transfer them to a wire rack to cool completely before frosting, preventing melting of the buttercream.
- Prepare the Frosting: Beat the softened butter until creamy. Gradually add the powdered sugar, then the milk and vanilla extract, beating continuously until the frosting is fluffy and smooth. Add black or orange food coloring if desired for a festive effect.
- Assemble the Cake: Once the cakes are completely cool, spread an even layer of frosting on one cake layer, then place the second layer on top. Frost the top and sides of the entire cake evenly to create a smooth finish.
- Decorate: Finish the cake by decorating with Halloween-themed sprinkles or edible glitter. Enhance the spooky vibe by adding plastic spider rings and placing black or purple candles around the cake for a festive presentation.
Notes
- Make sure the eggs and buttermilk are at room temperature for the best texture.
- Using Dutch-processed cocoa powder helps achieve a deep black color when combined with the black food coloring.
- You can substitute black food coloring gel with a combination of black and purple gels to create a unique dark hue if preferred.
- Allow the cake layers to cool completely before frosting to prevent the buttercream from melting.
- The cake is best served within 2-3 days and can be stored covered at room temperature or refrigerated for longer freshness.
- For a dairy-free option, substitute the butter with a plant-based alternative and use a dairy-free milk for the frosting.


