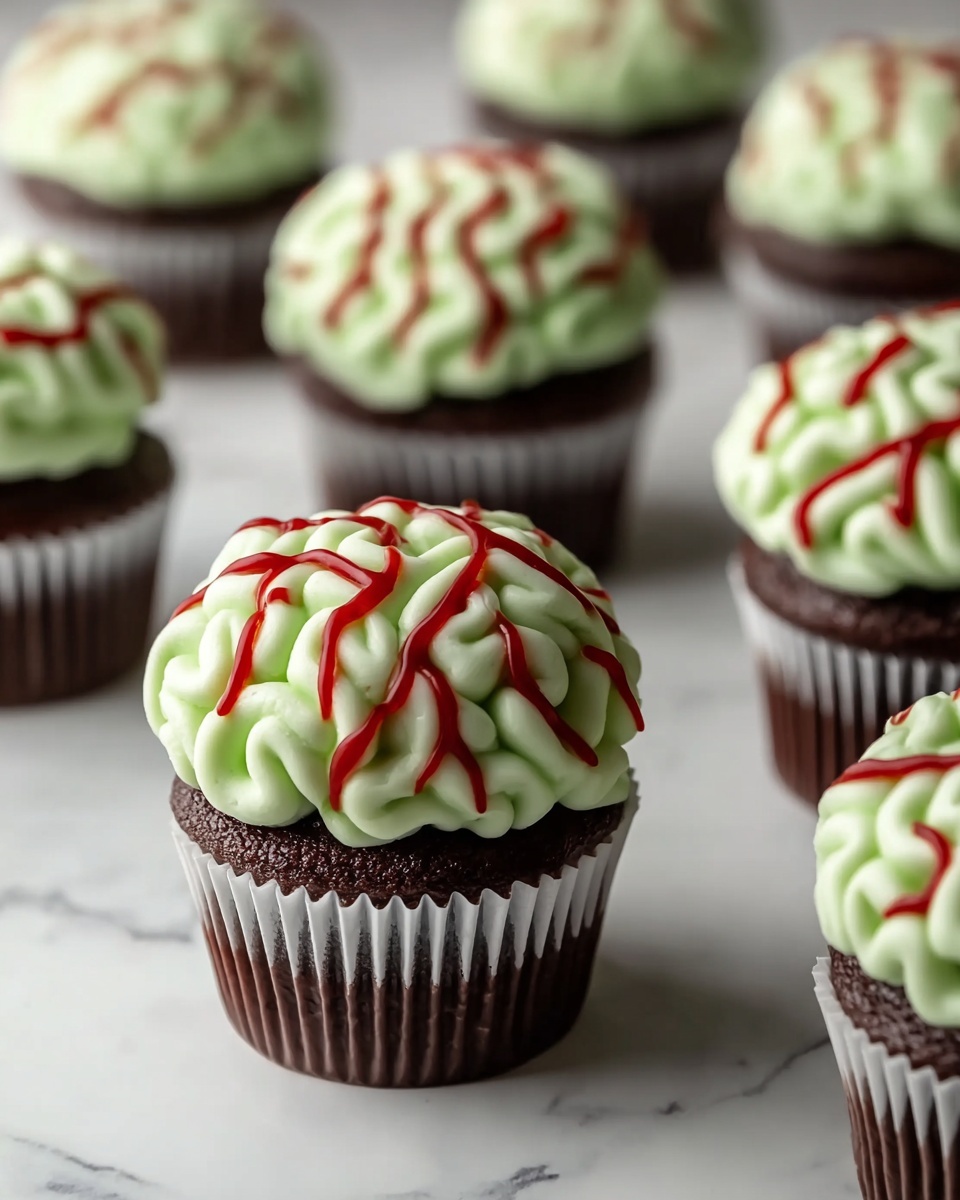
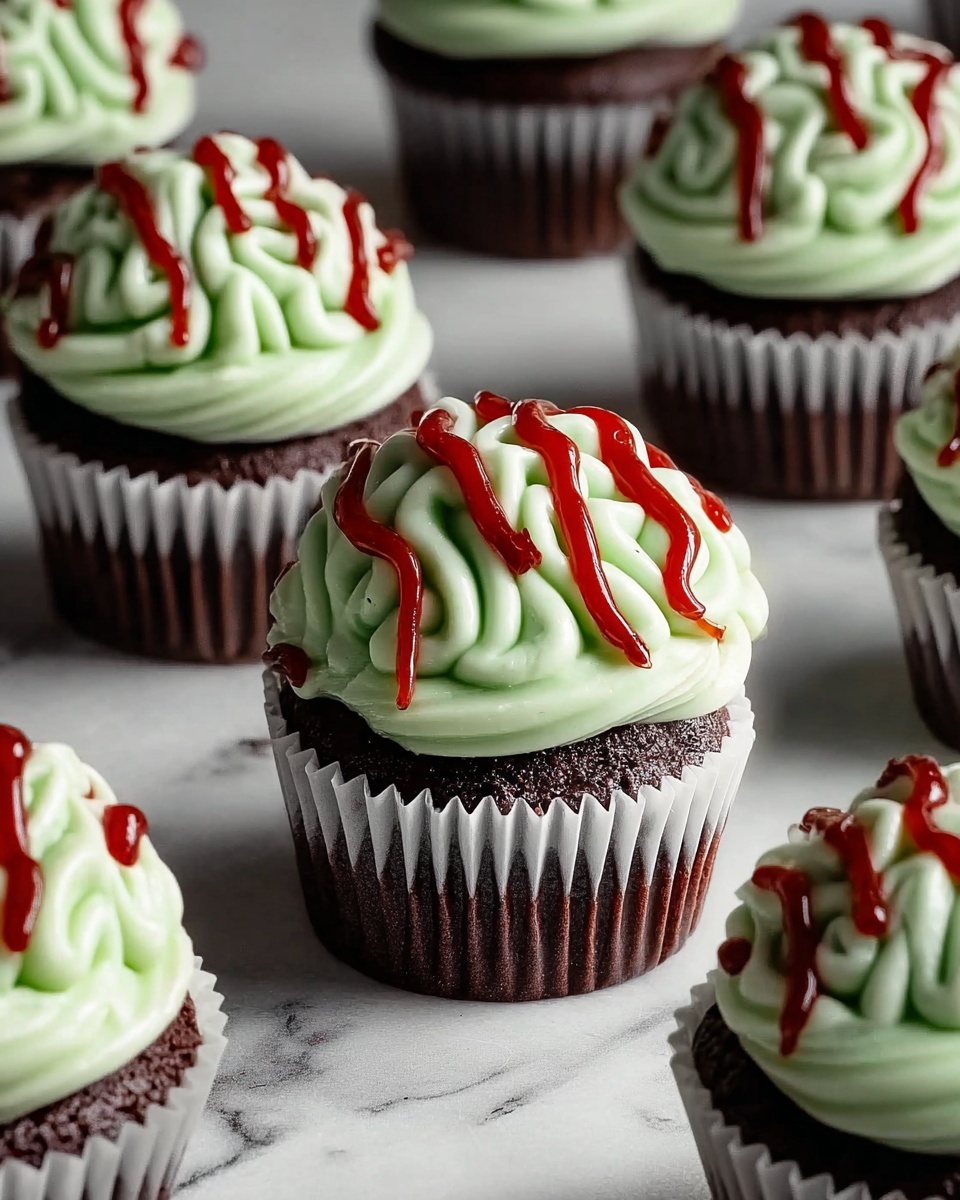
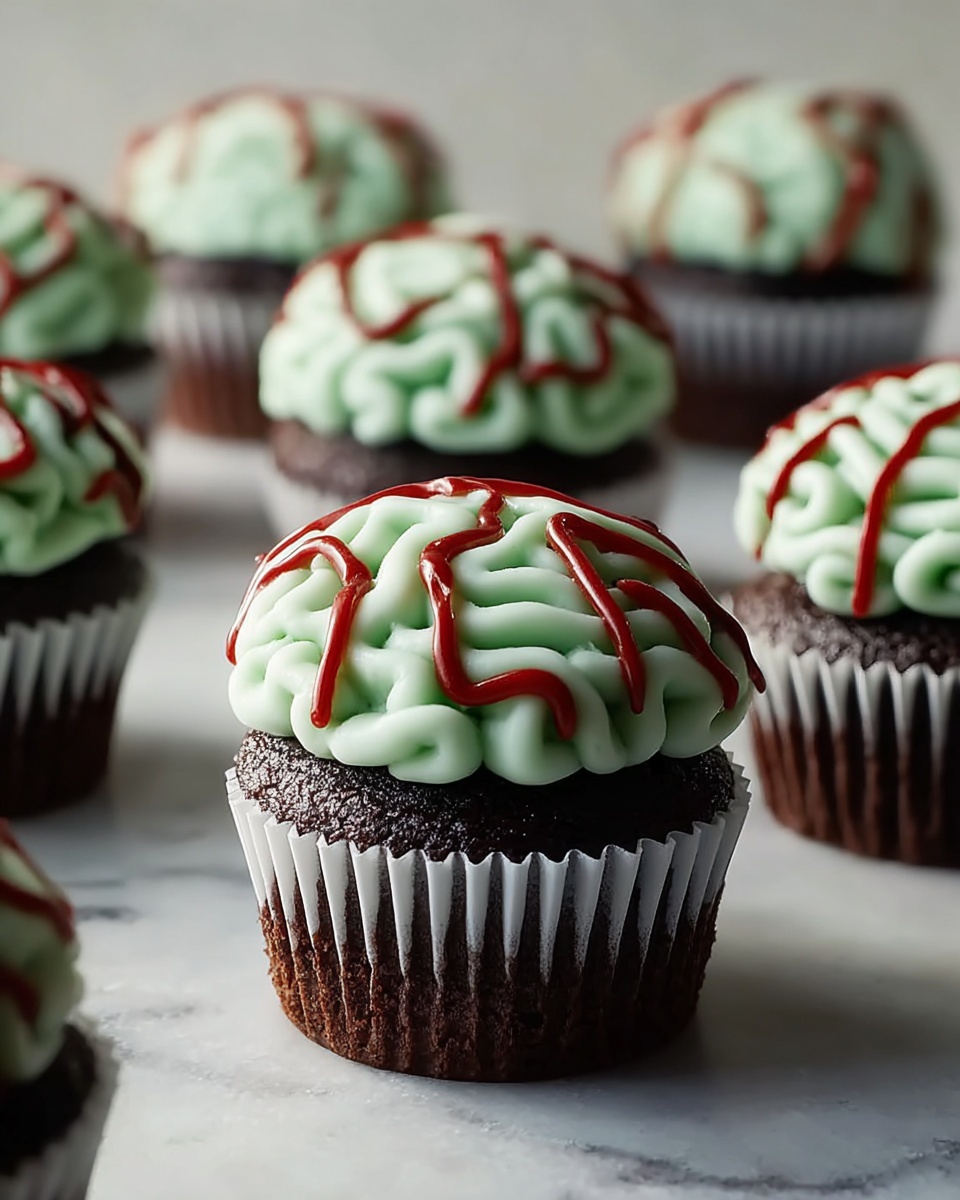
If you want to impress your friends with a chillingly fun dessert, the Zombie Brain Cupcakes Recipe is an absolute must-try. These cupcakes are not only delightfully moist and rich with chocolate flavor, but they also sport an eye-catching neon green “brain” frosting that’s spooky, playful, and perfect for Halloween or any zombie-themed celebration. The clever piping and red “blood” drizzle add an extra layer of fun and detail that makes this treat truly stand out in the crowd. Once you make them, you’ll see why the Zombie Brain Cupcakes Recipe is such a favorite for gatherings that need an unforgettable sweet twist.
Ingredients You’ll Need
The beautiful thing about this recipe is how straightforward the ingredients are—each item plays a vital role in creating the perfect cupcake texture, the luscious frosting, and that memorable brain-like effect. From the cocoa powder giving deep chocolatey notes to the neon green food coloring that brings the cupcakes to life, every ingredient is essential to nail the look and flavor.
- 1 1/4 cups (150 g) all-purpose flour: Provides structure to the cupcakes, ensuring they’re soft but sturdy enough to hold the frosting.
- 1 cup (200 g) granulated sugar: Sweetens and balances the cocoa’s bitterness perfectly.
- 1/2 cup (40 g) unsweetened cocoa powder: Delivers that rich chocolate flavor that is the base of these spooky treats.
- 1 tsp baking powder: Helps the cupcakes rise to a light, fluffy texture.
- 1/2 tsp baking soda: Works with the acidic buttermilk for tenderness and a moist crumb.
- 1/2 tsp kosher salt: Enhances all the flavors, preventing sweetness from becoming cloying.
- 1/2 cup (120 ml) buttermilk or whole milk: Adds moisture and a slight tanginess that complements the cocoa.
- 1/4 cup neutral oil: Keeps the cupcakes tender and moist without overpowering the flavor.
- 1 large egg, beaten: Binds everything together and gives a rich mouthfeel.
- 1/2 tsp pure vanilla extract: Enhances all other flavors with a warm, inviting aroma.
- 1/4 cup boiling water: Intensifies the cocoa flavor and creates a smooth batter.
- 4 cups (455 g) powdered sugar, sifted: For a silky-sweet frosting base.
- 1 1/2 cups (3 sticks) unsalted butter, room temperature: Provides creaminess and stability to the frosting.
- 1 tsp pure vanilla extract: Adds depth and aromatic complexity to the frosting.
- 1/4 tsp kosher salt: Balances sweetness perfectly in the frosting.
- 2 to 3 drops neon green liquid food coloring: Gives the frosting its signature brainy hue for maximum impact.
- Red decorating gel: For that gory finishing touch that mimics dripping blood.
How to Make Zombie Brain Cupcakes Recipe
Step 1: Prepare the Oven and Pan
Start by preheating your oven to 350°F (175°C). Line a standard 12-cup muffin tin with cupcake liners. This not only makes the cupcakes easy to remove but also helps with cleanup so you can enjoy more time savoring these treats.
Step 2: Mix Dry Ingredients
In a large bowl, whisk together the flour, granulated sugar, cocoa powder, baking powder, baking soda, and salt until everything is evenly combined. This step makes sure there are no lumps and that your cupcakes have a consistent texture throughout.
Step 3: Add Wet Ingredients
Pour in your buttermilk (or whole milk), oil, beaten egg, and vanilla extract. Whisk them together with the dry ingredients until your batter is silky smooth. This is when the magic begins, as the mix transforms into the luscious foundation of your cupcakes.
Step 4: Incorporate Boiling Water
Carefully add the boiling water to the batter and whisk until fully combined. The boiling water makes the batter thin but helps create a moist and tender crumb that melts in your mouth with every bite.
Step 5: Fill the Liners
Use a 1/4 cup measuring cup or spoon to fill each cupcake liner about two-thirds full. This ensures even baking and perfect cupcake domes ready for decorating.
Step 6: Bake the Cupcakes
Bake the cupcakes for 18 to 20 minutes, or until they’ve risen beautifully and a toothpick inserted into the center comes out clean. This is the moment when your kitchen starts to smell like a chocolate lover’s dream.
Step 7: Cool the Cupcakes
Let the cupcakes cool in the tin for about 10 minutes, then transfer them to a wire rack to cool fully. Full cooling is crucial so the frosting doesn’t melt or slide off when you begin decorating.
Step 8: Make the Frosting
Beat together the sifted powdered sugar, butter, vanilla extract, and salt on medium-high speed until the frosting is bright white, fluffy, and dreamy. This step sets the stage for that electrifying neon green glow your brain cupcakes are famous for.
Step 9: Tint the Frosting
Add 2 to 3 drops of neon green liquid food coloring to the frosting and mix until the color is vibrant and even. Feel free to add a drop or two more to achieve the perfect eerie green tone.
Step 10: Pipe the Brain Design
Transfer your green frosting to a piping bag fitted with a small round tip. Start by piping a small mound on each cupcake. Then pipe two long vertical lines side by side, followed by squiggly lines on either side to mimic the intricate folds of a brain. This piping design brings the Zombie Brain Cupcakes Recipe vividly to life.
Step 11: Apply the Red Gel
Finish the look by drizzling red decorating gel over the piped frosting. Let it settle into the crevices of the brain folds to imitate dripping blood, adding an impressively gory and authentic touch.
Step 12: Chill if Needed
If you won’t be serving the cupcakes right away, refrigerate them to keep the frosting firm and fresh. This also helps the “brain” maintain its shape until it’s time to wow your guests.
How to Serve Zombie Brain Cupcakes Recipe
Garnishes
To enhance the spooky vibe, consider adding a few edible “eyeballs” made from candies or small marshmallows alongside the cupcakes. Sprinkling a little edible glitter or green sugar crystals on the frosting can also add a sparkling brain effect that’s perfect for parties.
Side Dishes
Pair these cupcakes with punchy red fruit punch, blood-red berry compotes, or dark chocolate-covered strawberries for a creepy yet delicious contrast. A simple vanilla or mint tea also complements the rich chocolate flavor nicely without overpowering the brainy decoration.
Creative Ways to Present
For a dramatic display, arrange the cupcakes on a skull-shaped platter or scatter some plastic spider webs around the serving tray. You could even use cocktail sticks topped with zombie or skull toppers inserted into each cupcake for a themed touch that will delight guests of all ages.
Make Ahead and Storage
Storing Leftovers
Store leftover cupcakes in an airtight container in the refrigerator to keep the frosting fresh. They’ll stay delicious for up to 4 days, though they rarely last that long once your friends spot them!
Freezing
You can freeze unfrosted cupcakes wrapped tightly in plastic wrap and placed in a sealed container or freezer bag for up to 3 months. When ready to enjoy, thaw completely before frosting and decorating with the signature neon green brain design.
Reheating
If you want a warm cupcake experience, gently warm the unfrosted cupcakes in the microwave for about 10 seconds. Avoid warming the frosting directly, as it can melt and lose shape. For best results, frost after warming and enjoy immediately.
FAQs
Can I use a different type of food coloring for the frosting?
Absolutely! Gel or paste food coloring also works well for vibrant colors without thinning the frosting. Just remember to adjust the amount since gel is more concentrated than liquid coloring.
What if I don’t have buttermilk? Can I substitute something else?
You can easily make a buttermilk substitute by mixing one tablespoon of lemon juice or white vinegar with enough milk to make 1/2 cup. Let it sit for 5 minutes before using—this acidity helps the cupcakes stay tender.
Is there a way to make the cupcakes less sweet?
If you prefer a less sweet treat, reduce the powdered sugar slightly in the frosting or tone down the granulated sugar by a couple of tablespoons in the batter. Keep in mind that the traditional Zombie Brain Cupcakes Recipe is meant to be a fun, indulgent dessert.
Can I make these cupcakes vegan?
Yes, though it requires some swaps. Use plant-based milk mixed with vinegar for buttermilk, egg replacer or flax egg, and vegan butter or margarine for the frosting. The key is to maintain the right texture and flavor balance.
How do I avoid the frosting melting or sliding off?
Make sure the cupcakes are completely cooled before frosting. Also, chilling the frosted cupcakes slightly before serving helps the frosting set and hold its brain-shaped piping perfectly.
Final Thoughts
I can’t wait for you to give the Zombie Brain Cupcakes Recipe a whirl! They’re the perfect blend of spooky, delicious, and downright fun to make and share. Whether it’s for Halloween or your next zombie-themed bash, these cupcakes will quickly become the star of the party and have everyone asking for more. So gather your ingredients, get piping, and enjoy every creepy, chocolaty bite!
Print
Zombie Brain Cupcakes Recipe
- Prep Time: 20 minutes
- Cook Time: 20 minutes
- Total Time: 1 hour 40 minutes
- Yield: 12 cupcakes
- Category: Dessert
- Method: Baking
- Cuisine: American
Description
These spooky Zombie Brain Cupcakes are perfect for Halloween or any creepy celebration. Moist chocolate cupcakes are topped with a vibrant neon green buttercream piped to resemble brains, with red gel drizzled to create a gory effect. Fun to make and irresistible to eat, these cupcakes combine rich cocoa flavor with creamy frosting for a chillingly delicious treat.
Ingredients
Cupcakes
- 1 1/4 cups (150 g) all-purpose flour
- 1 cup (200 g) granulated sugar
- 1/2 cup (40 g) unsweetened cocoa powder
- 1 tsp baking powder
- 1/2 tsp baking soda
- 1/2 tsp kosher salt
- 1/2 cup (120 ml) buttermilk or whole milk
- 1/4 cup neutral oil
- 1 large egg, beaten
- 1/2 tsp pure vanilla extract
- 1/4 cup boiling water
Frosting
- 4 cups (455 g) powdered sugar, sifted
- 1 1/2 cups (3 sticks) unsalted butter, room temperature
- 1 tsp pure vanilla extract
- 1/4 tsp kosher salt
- 2 to 3 drops neon green liquid food coloring
- Red decorating gel, for drizzling
Instructions
- Prepare the Oven and Pan: Preheat your oven to 350°F (175°C). Line a 12-cup muffin tin with cupcake liners to facilitate easy removal and cleanup later.
- Mix Dry Ingredients: In a large bowl, whisk together the all-purpose flour, granulated sugar, unsweetened cocoa powder, baking powder, baking soda, and kosher salt until the mixture is evenly combined.
- Add Wet Ingredients: Pour in the buttermilk or whole milk, neutral oil, beaten egg, and vanilla extract. Whisk until the batter is smooth and well blended.
- Incorporate Boiling Water: Carefully add the boiling water to the batter, whisking continuously until fully combined. This step ensures the cupcakes will be moist and tender.
- Fill the Liners: Using a 1/4 cup measure, fill each cupcake liner about two-thirds full with the batter, evenly distributing among the 12 cups.
- Bake the Cupcakes: Place the muffin tin in the preheated oven and bake for 18 to 20 minutes, or until the cupcakes have risen and a toothpick inserted into the center comes out clean.
- Cool the Cupcakes: Remove the cupcakes from the oven and let them cool for about 10 minutes in the pan. Then transfer them to a wire rack to cool completely, approximately 1 hour.
- Make the Frosting: In a large bowl, using a stand mixer with a whisk attachment or electric mixer, beat the sifted powdered sugar, room temperature butter, vanilla extract, and kosher salt on medium-high speed. Beat for 2 to 3 minutes until the frosting is bright white, smooth, and fluffy.
- Tint the Frosting: Add 2 to 3 drops of neon green liquid food coloring to the frosting and continue beating until the color is evenly incorporated and vibrant. Add extra drops if a deeper green is desired.
- Pipe the Brain Design: Transfer the green frosting to a large piping bag fitted with a small round tip. Pipe a small mound about the size of a quarter on top of each cooled cupcake. Then pipe two straight vertical lines down the middle side by side, followed by squiggly lines on either side to mimic a brain’s folds.
- Apply the Red Gel: Drizzle a small amount of red decorating gel onto each cupcake, letting it settle into the creases of the piped brain to simulate dripping blood for a gory effect.
- Chill if Needed: Refrigerate the cupcakes if not serving immediately to keep the frosting firm and fresh.
Notes
- For a dairy-free version, substitute the buttermilk with almond milk and use dairy-free butter for frosting.
- If you don’t have neon green food coloring, mix blue and yellow food coloring in small amounts to achieve a bright green hue.
- Ensure cupcakes are completely cooled before frosting to prevent melting.
- Use a small round piping tip for detailed brain designs. Practice piping on parchment paper first if unfamiliar.
- Store frosted cupcakes in an airtight container in the refrigerator for up to 3 days.


